How can I configure the payment escalation?
Summary:
Set up the reminder template
Verify your Email Settings
Set up the dunning process
Elements you can use in the process
Set up multiple steps
Special cases
Thresholds
Important : Before starting, please be aware that at the same time, only one escalation procedure can be in progress.
Benefits of a payment escalation process
A smooth dunning process allows you to:
avoid overdue or failed payments
facilitate payment collection
improve customer retention, communication & experience
reduce the number of failed transaction
automate the sent out of dunning emails
adapt the tone of your reminders
Contract-based receivables management
billwerk uses contract-based receivables management, which always takes the contract as a whole into account and does not consider individual invoices and payments for the payment escalation.
In contract-based receivables management, the oldest open receivable is dunned.
A payment escalation is only reset when the complete contract balance has been cleared and not when a specific invoice has been paid.
Subsequent invoices whose due date has not yet been reached must also be cleared so that the payment escalation that has already started is stopped and reset.
Payment escalation in billwerk is carried out for all contracts with overdue receivables, except contracts where you manually deactivated the payment escalation . If overdue receivables exist in ended contracts, these contracts are included in the payment escalation process.
Set up the reminder template
Before setting up the process in billwerk, you need to create templates for the individual reminder levels.
Note: Please be aware, the items that became overdue after the escalation started will be included in the next dunning document. The next dunning document thus contains all overdue items.
Here are the steps to follow:
Click on your account icon in the top right and then Settings.
Navigate to Documents > Reminders.
If you would like to automate the sent out, please activate Send reminders automatically.
Note : If this option is disabled, all reminders need to be sent manually from the Dunnings Drafts . This setting is effective for all reminder templates.
IMPORTANT: Sending reminders manually delays subsequent escalation steps by the timespan between creation and dispatch.
In the Template picklist, choose an existing template OR click on New.
If you create a new template, you first have to set a telling internal name, your clients will not see.
Then click on Create.
The two tabs open that you know already from the PDF template article.
In the email with which you send your reminder, you can instruct the customer that the entire account balance is to be paid, not just the overdue amounts. The Balance placeholder in the email template is helpful for this.
Note: We suggest to anticipate the templates for the different levels of dunning you would like to implement. If you would like to send out three reminders using a different tone to insist on paying, it would be a good idea to prepare them in advance.
Verify your Email Settings
In order to avoid any surprises, when sending out automatic dunning emails, we suggest to check on your email settings.
Staying in the Settings, go to Documents > General Settings.
In the Email Settings section:
Read this article to activate your own sender address.
Check your:
Sender Alias Name.
Reply-To-Address
BCC
You are happy with this configuration? Great, then let us have a look at the actual process.
Set up the dunning process
Note: We highly recommend to set up this process in the sandbox first, in order to do a sufficient testing of your configuration.
Important: When the dunning process begins in a contract, the contract remembers the payment escalation process currently in place.
You can therefore change or extend the escalation process without affecting the current dunning procedure.
If the dunning process in the contract is then reset, the new escalation process is used in the next dunning run.
To configure the payment escalation (dunning), follow these steps:
Still in the Settings, navigate to Payment > Payment Escalation on the top left.
Open the tab Escalation Process.
Elements you can use in the process
Use the field Days past Due to set the days on which an action is to be carried out after the payment is overdue.
In the next pick list, choose between the following Actions:
Trigger Webhook: the webhook PaymentEscalated will be triggered in this step.
Note
Note:
(1) This is not a separate reminder step, but can be configured as an intermediate step or at the same time as the Create Reminder action.
(2) If you use it, make sure that the webhook is configured in the Settings > Integration > Webhooks.
Create reminder: you can select the desired reminder template for the respective escalation level.
Options: Find the reminder templates for the individual reminder levels you configured earlier in Settings > Documents > Reminders.
In the last picklist choose between:
Default: The default sending option that is stored in the settings under Documents > General Settings is applied.
Email: The reminder will be sent by e-mail.
Snail Mail: The reminder will be sent by mail
Archive: The reminder is not sent, but is available to the customer via the self portal.
Pause contract: Pause a contract automatically during the dunning run without cancelling the contract.
Note
Note: The contract can be resumed afterwards.Options:
The contract can be cancelled Immediately
After current billing period: The current period covers the period up to the Billed to time of the contract.
End contract: Cancelled automatically during the dunning run, once this final dunning level is reached.
Options:
The contract can be cancelled Immediately
After current billing period: The current period covers the period up to the Billed to time of the contract.
Important: Escalation steps of the type End Contract Immediately usually result in credit notes because the contracts have originally been billed for a period in the future and the service is now terminated prematurely.
Set up multiple steps
Knowing the different elements you can use now, you can put them in the order that corresponds to your business need.
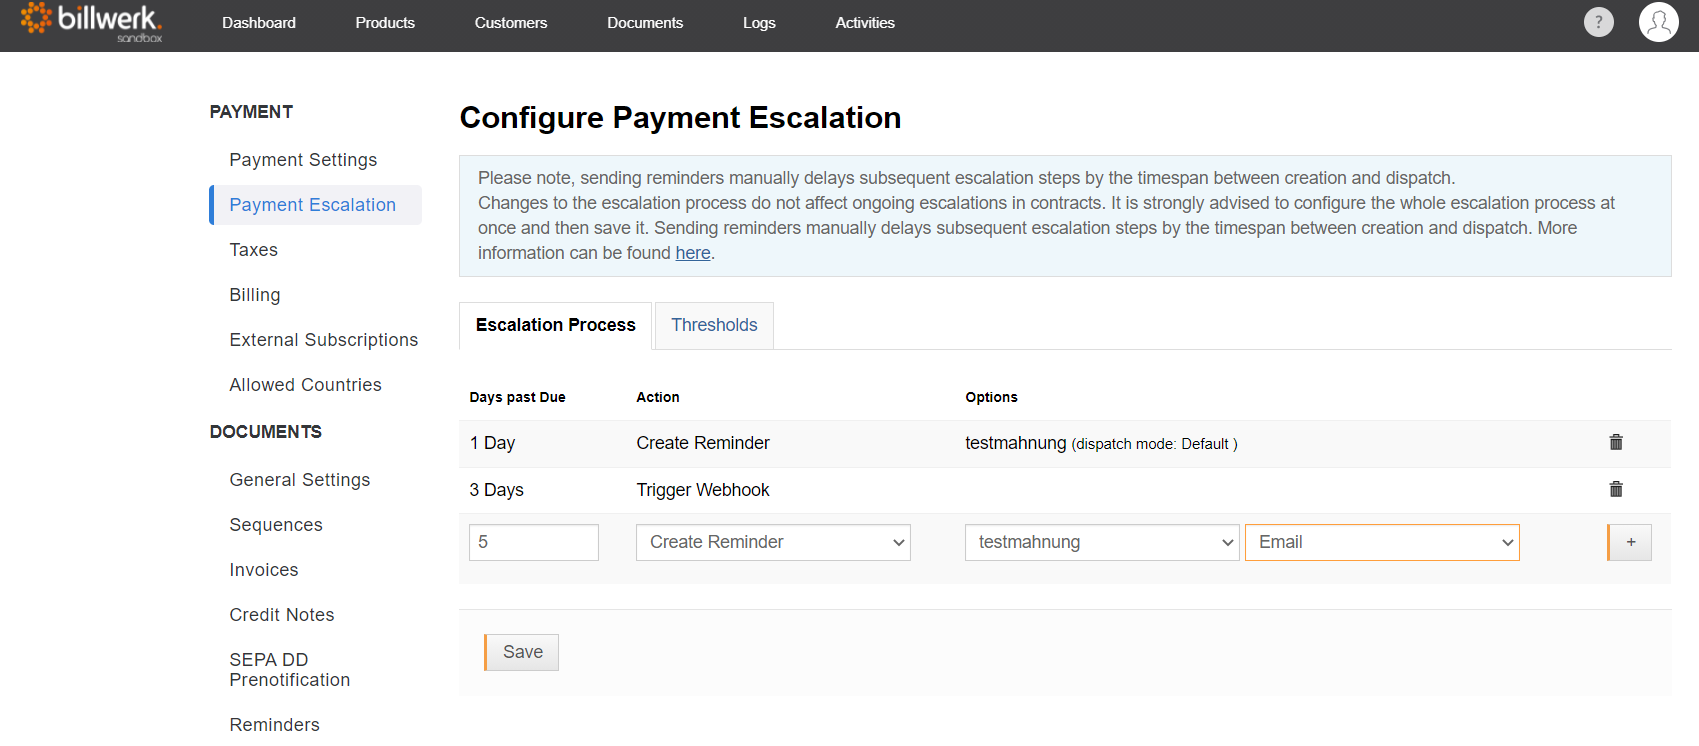
By clicking on the + symbol you can add the steps.
Finally, store your settings using the Save button.
Note: If another receivable in the already escalated contract becomes overdue, the escalation does not go to the next stage for this reason.
The escalation goes to the next stage when the first dunned payment is overdue a certain number of days. The number of these days must first be defined in the payment settings.
Special cases
If you have been using billwerk for a long time without having configured payment escalation and there are open receivables, payment escalation is started for all contracts with open receivables after the payment escalation has been reconfigured.
Example: a dunning letter is configured after 14 days, all contracts whose receivables are already 14 days overdue receive the dunning letter immediately.
If you want to have the customer pay off only the overdue item and not the entire account balance, you can manually reset the escalation in the contract after paying the overdue receivable.
Thresholds
You can also set a threshold value from which the payment escalation should be started for each used currency. If you send your reminders by letter post, you can avoid sending reminders that have a lower value than the postage costs.
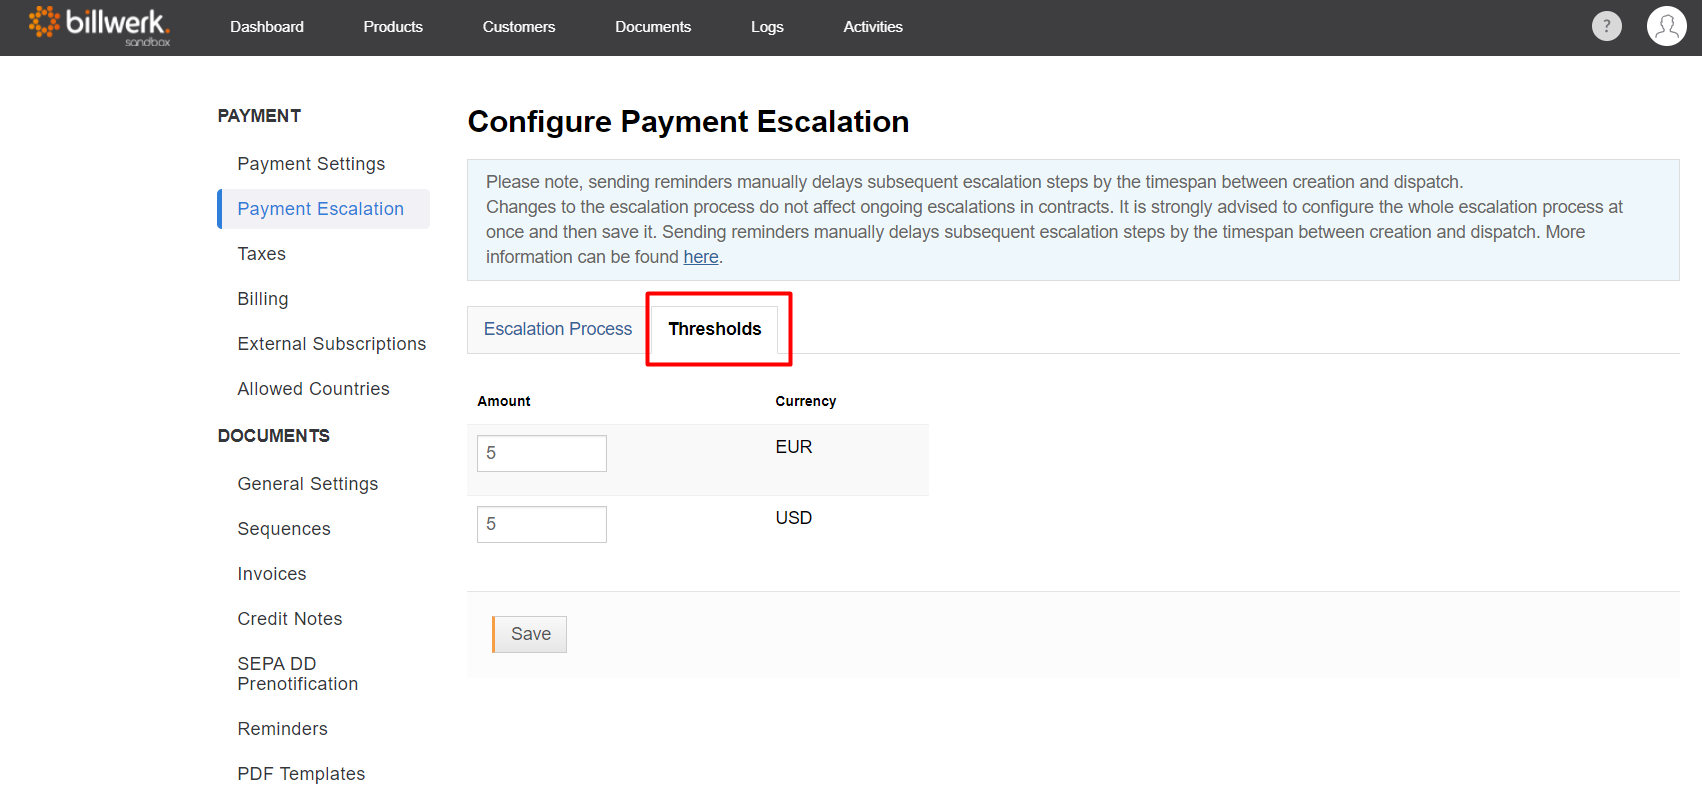
To configure a threshold:
Select any amount per currency.
Click on Save.
Tips for test runs
Important: Always test your escalation processes on the sandbox first.
We recommend that you select a short time period for each step (e.g. only one day). This way you avoid long waiting times for the test result.
The following payment methods are well suited for fast payment escalation:
Credit card payments are always due the next day, allowing for short-term test results.
Disable recurring payments in the contract to force a past due payment before the next invoice is generated.
Some payment service providers also offer special test credit card numbers with an expected outcome, so they can use a test credit card that results in a failed payment, for example. Check with your payment provider or look in the FAQs of the respective PSP to see if test data is listed there.
Blacklabel: FakeProvider can simulate certain failed payments, e.g., fail right at the beginning or fail after the first successful payment, to test multiple use cases.
When using the option without payment data, the due date is also set to the next day.
Escalation will be initiated automatically if no external payments are registered. This is a simple test scenario where you can leave the recurring payments option enabled in the contract.
The On account payment method can also be used.
For this case, it is recommended to set the individual term of payment of the contract to the next day to enable fast escalation.
In any case, testing payment escalation is a multi-day process that you should plan for accordingly.