Amazon Pay
Table of contents
Prerequisites
Getting URL for Allowed JavaScript origins
Setting up Amazon Pay
Setting up Amazon Pay in billwerk
Setting up notifications
Setting up a test account
Limitations
Prerequisites
You need an Amazon Pay account.
Notes
External refund handling: When an end customer files an A-Z-claim with Amazon Pay and you as a merchant loose this case this will trigger an external refund by Amazon Pay. We process this as a chargeback in billwerk with the usual consequences as it is likely that the customer will also dispute the next payments made via the Amazon payment mandate.
The integration does not support custom chargeback fees setup in billwerk.
The integration assumes the merchant does not dispute any dispute/chargeback raised by end-customers.
The integration does not support custom chargeback fees setup in billwerk, this is not required as there won't be chargeback handling fees from Amazon Pay.
billwerk will provide information about the user's e-mail address and address country in contracts that use Amazon Pay as a mean of payment and during signup via Amazon Pay.
Note
ProcessPaymentData method
Please be aware before starting your implementation of SubscriptionJS on your sign up page, that the ProcessPaymentData method is not supported by this PSP.
Getting URL for Allowed JavaScript origins
To get to the Payment Settings, click on your email address > Settings in the top right corner.
In the PAYMENTS section, click Payment Settings.
In the AmazonPay row, click the

icon.

The URL for the Allowed JavaScript origins field can be found in billwerk in the Amazon Pay settings.

Copy the URL.
Setting up Amazon Pay
Official setup information can be found here: Get set up for integration.
Merchants need to create an AmazonPay live-enabled seller central account. It is required even for testing.
Follow the process of creating your own AmazonPay seller central account.
After the creation, you need to configure a seller central account to get a MerchantId and a StoreId.
In order to find the MerchantId, please go to the Business Information section in Settings > Account info and select Your Merchant Token (it is required for AmazonPay setup in billwerk).

To create a StoreId, please navigate from the Seller Central Account to Integration > Integration central.
Please select the Manage Client/Store ID configurations option.
Here you can choose Create new client ID>store ID.
Now you can fill in all required fields.

Note
To fill in the field Allowed JavaScript origins (optional), use the URL from the billwerk's AmazonPay settings page. It must be filled for Production mode.Note

Note
Important: If you are using SubscriptionJS in your own website, you need to add your website's URL.Added JavaScript origins don't show immediately. The verification of newly added origins can take up to 48hours.We recommend to handle this issue as early as possible. You don't need to do it in a test mode.
After those steps, the StoreId will be generated (it is also required for setup of AmazonPay in billwerk).
Go to billwerk's AmazonPay settings page. Copy the billwerk developerId field.

Go back to the seller central account and navigate to Settings>UserPermissions.
Click on Visit Manage Your Apps.

Please choose the option Authorise new developer.

Then, add a billwerk name and a developerId (from step 8. above).
Agree to the Terms & Conditions to receive the mwsAuthToken (required for a setup of AmazonPay in billwerk). Copy it.
Copy the Store ID and Merchant ID as well. You will need this data later for configuration in billwerk.
Setting up Amazon Pay in billwerk
By default, after a creation of a new merchant account, you should be able to see AmazonPay inside the Payment Settings without adding any feature flag.
Prerequisites:
StoreId,
MerchantId,
mwsAuthorisationToken,
All the information how to get them are described above.
To get to the Payment Settings, click on your email address > Settings in the top right corner.
In the PAYMENTS section, click Payment Settings.
In the AmazonPay row, click the
icon.
From the Mode drop-down list, select the Production mode.
Fill in all the credentials using copied Ids and Tokens generated in Amazon Pay.

If you want the payment data to be removed after the contract is closed, select the Remove payment data for finished contracts checkbox.
Note
Note: If a ledger balance will be not 0, the payment method should not be deleted.If you want to revoke consent for terminated contracts, select the Revoke agreement for finished contracts checkbox.
Note
Note: If a ledger balance will be not 0, the agreement has not been revoked.To save your input, click the Save button.
You can see the changed Status in the Payment Settings section.

Activate the AmazonPay by clicking the check-box under Activated.

Setting up notifications
Official setup information can be found here.
To set up Amazon Pay notifications, you need to configure the IPN endpoint in your Amazon Pay account. You can find the required URL of the IPN endpoint in the Amazon Pay settings in billwerk.
From seller central account, go to Settings>Integration Settings.

Click on Edit in the Instant Notifications Settings.


Fill in the Merchant URL textfield with the IPN link from the billwerk's AmazonPay settings shown below:
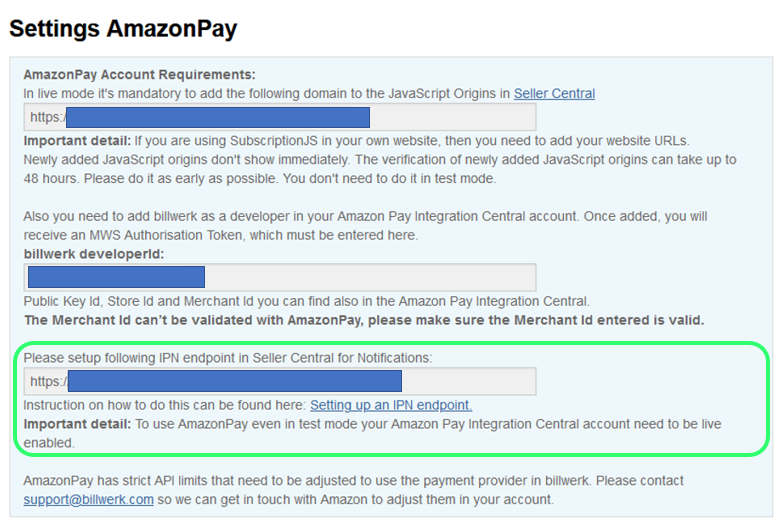
For more information, see the official Amazon Pay documentation.
Setting up a test account
To fully set up the Amazon Pay integration, you need to create an Amazon Pay test account.
Navigate to Menu >Integration > Test Accounts.

Click on Create a new test account.
Fill in the required data to create the account.

Note
AmazonPay has strict API limits that need to be adjusted to use the payment provider in billwerk. Before going live with AmazonPay, please contact support@billwerk.plus to adjust them in your account.For more information, see the official Amazon Pay documentation.
Limitations
Important notes about limitations of integration with Amazon Pay:
Taking the address from the Amazon Pay account and inserting it in the order process is not supported in our integration.
Refunds:
Refunds that are triggered in Amazon Pay's UI are interpreted as chargebacks by billwerk, this is necessary to depict some cases that can be triggered by end customers correctly. This means if you trigger a refund in the Amazon Pay merchant console, this will lead to a chargeback in billwerk. Please do not trigger any refunds in the Amazon Pay merchant console.
Partial refunds triggered in the amazon Pay UI will not be processed
The integration does not support custom chargeback fees setup in billwerk.
Due to technical limitations of Amazon Pay's API, the integration assumes that you would not dispute any dispute cases raised by end-customers:
It means you will automatically lose the dispute case and we will process a chargeback for the payment.
Additionally, there is no chargeback handling fee from AmazonPay.
1.000€ per month is the payment limit per month per payment mandate.
Please be aware, that we do not update customer data like CountryCode for existing charge permissions.
Important: There are v ery strict rate limits on Amazon Pay's side, if you would like to use this integration, please get in touch with billwerk and Amazon Pay to set the limits according to your peak of expected transactions.
Please find here the default API rate limits.
For more information, see the official Amazon Pay documentation.