HubSpot Connector
Table of contents
What is the HubSpot Connector?
Prerequisites
Generating billwerk Client ID and billwerk Client Secret
Getting the billwerk Public API Key
Installation
Installing the HubSpot Connector
Configuring the required webhooks
Starting the synchronization of products
Creating a Signup Deal for validation by billwerk
Creating a contract in billwerk
Updating company data
Updating contract data
Updating contracts from billwerk
Creating an up-/downgrade deal
Validating an up-/downgrade deal by billwerk
Executing an up-/downgrade
Custom fields
Creating a property in HubSpot
Mapping custom fields
Finalizing configuration
Multi tenant environment
Setting the entity of a contact
Setting the entity of a company
Hiding products in billwerk
Setting invoice dispatch mode
What is the HubSpot Connector?
The HubSpot Connector enables billwerk customers to synchronize customer and contract data between HubSpot and billwerk. Customer data can be adjusted directly in HubSpot. Deal management actions are also available. This reduces effort for duplicate maintenance of data and enables billwerk customers to design processes seamlessly and effectively across system boundaries.
With the HubSpot Connector you are able to automate recurring billing while managing your customer base in HubSpot and your sales representative can furthermore work within their familiar HubSpot environment.
Prerequisites
In order to use the billwerk HubSpot Connector, you need at least a HubSpot Professional plan or above.
You need the billwerk Client ID and billwerk Client Secret.
You need the billwerk Public API Key.
In HubSpot a contact must be created with following entries:
First Name
Last Name
Email
Phone Number (optional)
In HubSpot a company must be created with following entries:
Company Name
Locale
Country
Street
House Number
Postal Code
Address line 1 (optional)
Address line 2 (optional)
VAT ID (optional)
Default Bearer Medium (for document dispatch, optional)
Destination Country (optional)
billwerk customer external id (optional)
Generating billwerk Client ID and billwerk Client Secret
You have to generate a billwerk Client ID and billwerk Client Secret to connect billwerk with 3rd party applications.
Click on your email address > Settings in the top right corner.
In the BILLWERK APPS section, click My Apps.
In the Name text field, enter the name you want to use for your connection to HubSpot

In the Client Type dropdown list, select Confidential.

Click the Add button.

Copy ID and Secret to a safe location.

Getting the billwerk Public API Key
Note
If you have more than one entity, you must repeat this step for each entity. You must first enter the Public API key of the root entity and then of all subtenants.
Click on your email address > Settings in the top right corner.
In the INTEGRATION section, click Self-Service.
Copy the value for the “Public API Key” to a safe location.
Installation
Installing the HubSpot Connector
Start the installation of the billwerk HubSpot-Connector in your HubSpot portal by clicking Start the installation.
If you have multiple HubSpot portals connected to your user, choose the portal where you wish to install the billwerk HubSpot Connector.
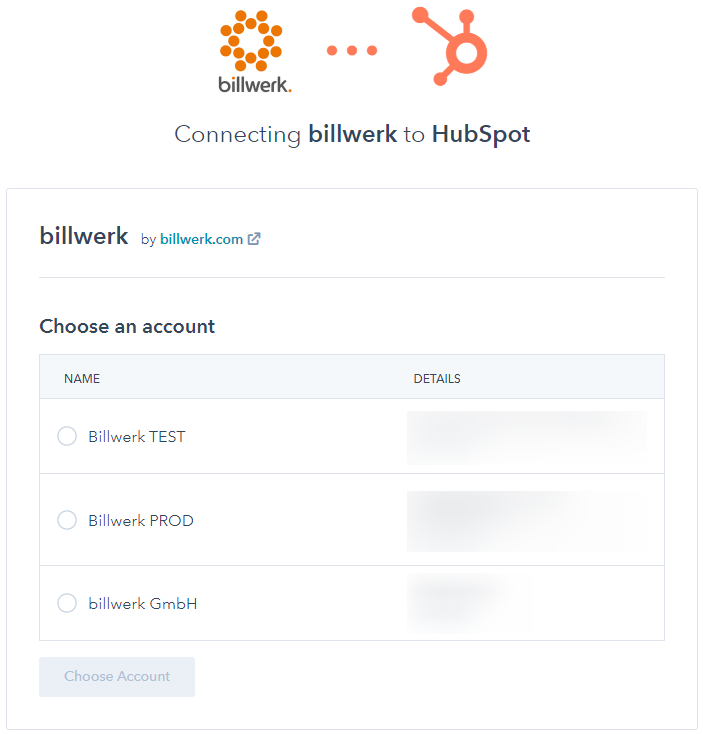
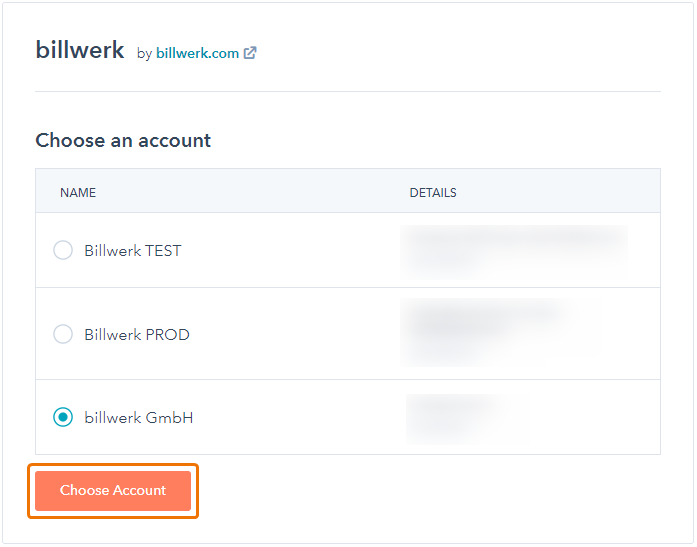
Click the Choose account button.
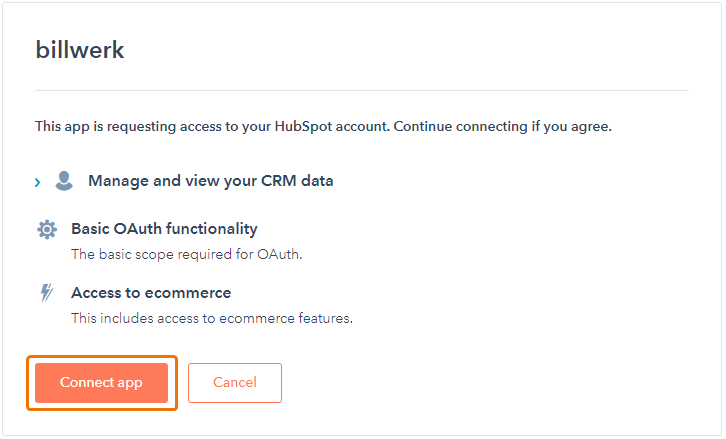
If you agree to share your data with billwerk as indicated, click the Connect app button.
Set a password for your billwerk HubSpot Connector account.

To confirm your entered password, click the Confirm Password button.
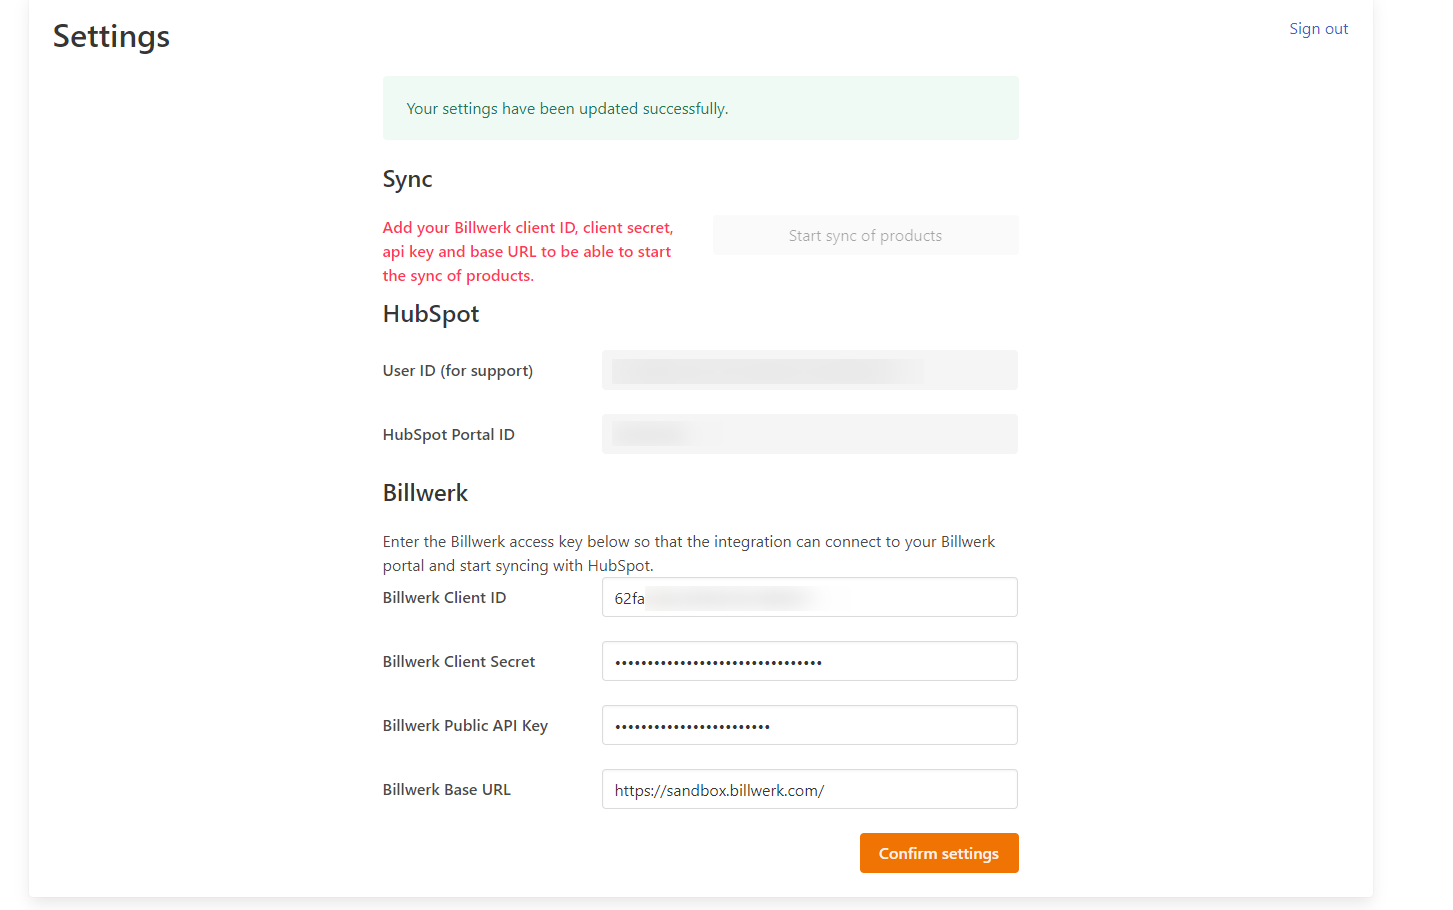
Fill in the required fields.
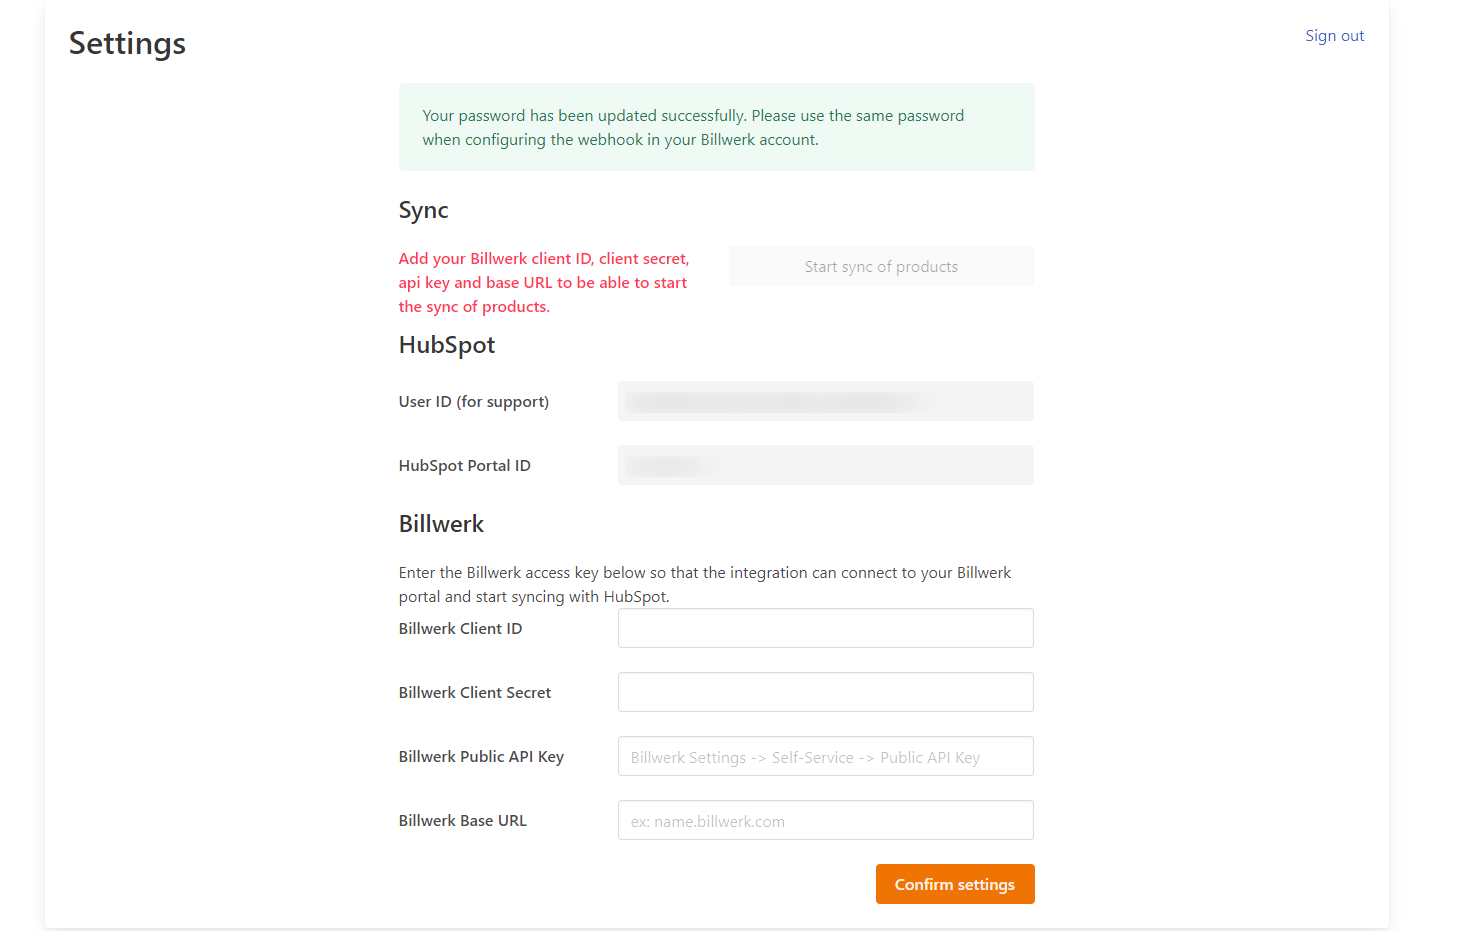
Billwerk Client ID
See Generating billwerk Client ID and billwerk Client Secret
Billwerk Client Secret
See Generating billwerk Client ID and billwerk Client Secret
Billwerk Public API Key
Note
If you have more than one entity, you must repeat this step for each entity. You must first enter the Public API key of the root entity and then of all subtenants.See Getting the billwerk Public API Key
Billwerk Base URL:
If you want to connect your HubSpot portal to a sandbox account, enter sandbox.billwerk.com.
If you want to connect your HubSpot portal to your production account, enter app.billwerk.com.
To save your input, click the Confirm settings button.
Using the billwerk HubSpot connector requires additional configuration in the HubSpot environment, please contact support@billwerk.com for further instructions.
Configuring the required webhooks
Switch to billwerk.
Click on your email address > Settings in the top right corner.
In the INTEGRATIONS section, click Webhooks.
In the Authentication Type dropdown list, select the desired authentication type.
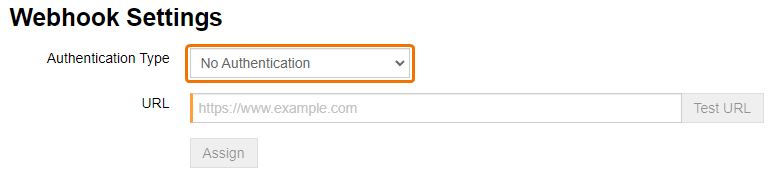
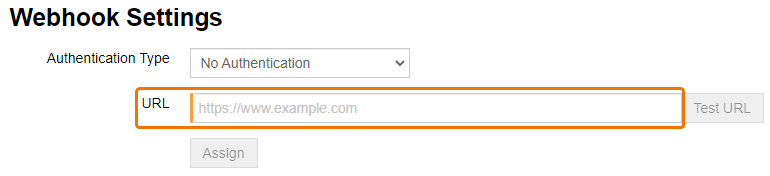
In the URL text field, enter the URL https://hubspot.billwerk.com/api/webhook/billwerk/events. The webhooks will be sent to this URL.
In the Events section, activate the checkbox of the following webhooks:
ContractCreated
ContractChanged
InvoiceCreated
OrderSucceeded
PaymentEscalated
PaymentEscalationReset
To finish the configuration of webhooks, click the Assign button.
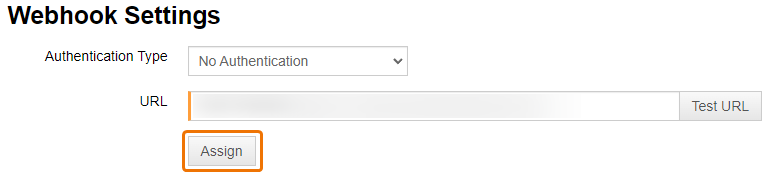
The configured webhooks are displayed in the Active Webhooks section.
Starting the synchronization of products
Please contact our Support team to receive support with setting up required fields and workflows in HubSpot.
Once your settings have been saved successfully. You can start the synchronization of your products from billwerk to HubSpot. The products are automatically synchronized every 12 hours. You cannot manually synchronize the products.
Switch to HubSpot.
In the Sync section, click Start sync of products.
Once your products have been synchronized, you can use the billwerk HubSpot Connector for your deal management.
Creating a Signup Deal for validation by billwerk
You can make an offer to a client by creating a deal in HubSpot. The deal then can be validated by billwerk.
Alternatively, the deal can be created without selecting line items and validating by billwerk.
During the negotiation with your client, you can then select products from the product catalog in HubSpot that originate from billwerk and perform the validation after they have been selected. If the products selected are then changed, the validation can be requested once again.
Note
If you have a multi-tenant environment, the contact, company, and line items must be within one entity.
Click Create deal in HubSpot.
In the Deal Type dropdown list, select the desired deal type.
Signup: Used for new customer
Signup for existing Customer: Used for existing customer
In the billwerk validation dropdown list, select Request validation.
In the Contact dropdown list, select the contact to be assigned to the deal.
In the Company dropdown list, select the company to be assigned to the deal.
If you have a multi-tenant environment, select the entity of the deal from the Entity dropdown list.
In the Add line item dropdown list, select the desired line items.
Optionally, in the Start Date calendar, select a start date.
Optionally, in the Payment term (in days), enter the number of days.
Note
The payment term can be set only for signup deals. Setting the payment term for an upgrade deal has no effect.Individual term of payment changes the due date of an invoice and therefore changes the time from which a receivable is considered overdue.
The entered number of days will be set in the settings for the Individual term of payment in the contract in billwerk.
Click Create and refresh the page.
Once the deal is successfully validated, the billwerk validation is set to Successfully validated.
Creating a contract in billwerk
Note
The contract should only be created after a successful validation by billwerk.Once the client has accepted the offer, you can set the deal to closed-won in the deal pipeline. Then a contract and customer can be created in billwerk.
To create a contract in billwerk, open the deal in HubSpot.
In the Apply changes in billwerk dropdown list, select Request change.
In the Stage dropdown list, select Closed won.
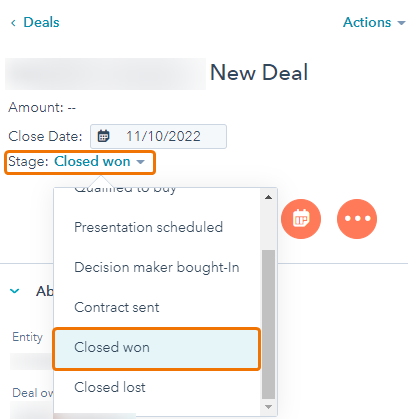
The deal stage will be changed to Closed won.
Updating company data
Note
Before data can be updated, a contract must be created via HubSpot in billwerk. Data will only be transferred to billwerk if the field "Updated customer in Billwerk" has the value "Successfully updated in billwerk". Otherwise the systems will be out of sync and you need to continue to make adjustments in HubSpot until the error is resolved to re-establish synchronization.Changes in the fields relevant for billwerk in the HubSpot company are automatically transferred to the billwerk customer.
Updating contract data
Note
Before data can be updated, a contract must be created via HubSpot in billwerk. Data will only be transferred to billwerk if the field "Updated customer in Billwerk" has the value "Successfully updated in billwerk". Otherwise the systems will be out of sync and you need to continue to make adjustments in HubSpot until the error is resolved to re-establish synchronization.Changes in the fields relevant for billwerk in the HubSpot contact are automatically transferred to the billwerk customer.
Updating contracts from billwerk
Note
Before data can be updated, a contract must be created via HubSpot in billwerk.Whenever an invoice or credit is created, payment escalation is triggered or reset, or an order is placed in billwerk for the contract, the relevant information will be updated in HubSpot deal.
Changes of following information in billwerk are triggering the update of the deal in HubSpot:
Payment Escalated
Balance
BilledUntil
Lifecycle status
Payment Provider
Payment Method
End Date
Creating an up-/downgrade deal
Note
Before data can be updated, a contract must be created via HubSpot in billwerk.You can create a new deal to up-/downgrade an existing contract in billwerk.
Click Sales > Deals in HubSpot.
Select the deal you want to up-/downgrade.
In the Up-/Downgrade deal dropdown list, select Create new Deal.
To save your input, click the Save button.
A new deal with the correct company and contact assigned for follow-up is created.
Click Sales > Deals in HubSpot.
Select the newly created deal with the name Up- / Downgrade deal for (origin deal name).
Validating an up-/downgrade deal by billwerk
Note
Before data can be updated, a contract must be created via HubSpot in billwerk.You can upgrade/downgrade an offer and select the products you want to add to the existing billwerk contract. Then you can validate the offer by billwerk before sending it to the customer.
Click Sales > Deals in HubSpot.
Select the deal you want to validate.
In the Deal Type dropdown list, select Upgrade.
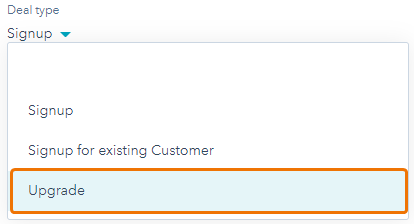
In the billwerk validation dropdown list, select Request validation.
To save your input, click the Save button and refresh the page.
Once the deal is successfully validated, the billwerk validation is set to Successfully validated.
Executing an up-/downgrade
Note
Important: Before data can be updated, a contract must be created via HubSpot in billwerk.
When the deal was successfully validated and the billwerk validation is set to Successfully validated, you can execute the up-/downgrade. This will trigger the change of the contract in billwerk.
To up-/downgrade a contract in billwerk, open the deal in HubSpot.
In the Stage dropdown list, select Closed won.
In the Apply changes in billwerk dropdown list, select Request change.
The Contract ID of the origin deal will be applied to this deal.
The synchronization of the origin deal will be stopped.
The deal will remain in the state before the last contract update.
To save your input, click the Save button and refresh the page.
Custom fields
Creating a property in HubSpot
To prepare the usage of billwerk custom fields in HubSpot, you need to create a property in HubSpot first.
The Group of the property needs to be set to Billwerk custom fields sync.
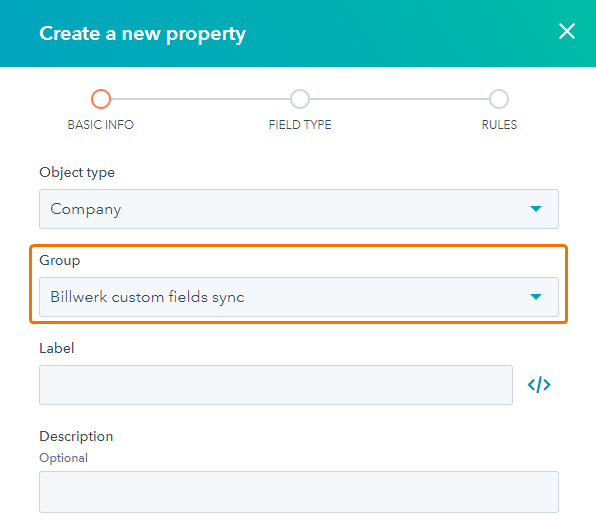 |
For more information, see the official HubSpot documentation.
Mapping custom fields
Note
To map HubSpot properties and billwerk custom fields, both the Hubspot properties and the billwerk custom fields must be created beforehand.
Custom fields in billwerk can be mapped to properties in Hubspot. When the mapping is done, the properties in HubSpot can be used in deals or company details.
Open the HubSpot settings page https://hubspot.billwerk.com/.
At the top right of the page, click Custom mappings.
In the Entity ID section, select the desired entity.
In the Object section, select the object type.
dealcontract in billwerk
companycustomer in billwerk
In the HubSpot property section, select the HubSpot property.
In the billwerk property section, select the billwerk custom field.
To map the HubSpot property with the billwerk custom field, click the Add mapping button.
The property and the custom field are now mapped. The property in HubSpot can now be used.
Finalizing configuration
Note
Properties of the object type deal that are added and/or filled in after the contract is created in billwerk will not be updated in billwerk.
To finalize the configuration of properties, you have to add properties linked to custom fields to the workflow by adapting the corresponding workflow in HubSpot. For the object type company, you have to edit the workflow Workflow billwerk customer updated from Company.
For more information, see the official HubSpot documentation.
Multi tenant environment
If you have a multi-tenant environment, you may need to perform some additional steps.
Setting the entity of a contact
Open the contact in HubSpot.
In the Entity dropdown list, select the desired entity.
To save your input, click the Save button.
Setting the entity of a company
The company must be within the same entity as the company's contact person.
Open the company in HubSpot.
In the Entity dropdown list, select the desired entity.
To save your input, click the Save button.
Hiding products in billwerk
If you hide a plan variant, component or discount in billwerk, the hidden element will no longer be available in the HubSpot product library after synchronization. A plan variant or component used in a deal is not removed from the deal when it is hidden.
As soon as you show the hidden element again in billwerk, the element will be available again in the HubSpot product library after synchronization.
Setting invoice dispatch mode
Note
Before data can be updated, a contract must be created via HubSpot in billwerk. Data will only be transferred to billwerk if the field "Updated customer in Billwerk" has the value "Successfully updated in billwerk". Otherwise the systems will be out of sync and you need to continue to make adjustments in HubSpot until the error is resolved to re-establish synchronization.
In HubSpot you can select the desired invoice dispatch mode for each company. The selected dispatch mode is updated in the Customer Details in billwerk during the periodic synchronization.
Note
SnailMail represents dispatch of the invoice via post mail. This only works for production accounts.
If you want to use e-Invoicing, this feature needs to be unlocked for your account. If you are interested, please contact support@billwerk.com.
To use e-Invoicing (EInvoicing), you have to set the property E-Invoicing Receiver ID,E-Invoicing Network and Buyer Reference in HubSpot.
Open the company in HubSpot.
In the Default bearer medium dropdown list, select the desired dispatch mode for the invoices of the customer.
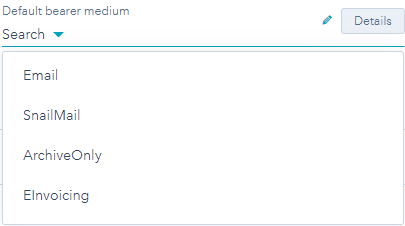
Email
Send invoices to the customer by email.
SnailMail
Print, envelope, stamp and forward invoices for a small fee.
ArchiveOnly
Offer invoices for download as a PDF file in the customer self-service portal.
EInvoicing
Send invoices to the customer as e-Invoice. Currently the e-Invoicing networks Finvoice and Peppol are available.
To save your input, click the Save button.