Dunning management
Also you propose a multitude of payment methods, by default we anticipate in the Billwerk+ Pay application the case that you can not charge the customer's choice of payment.
A dunning plan is an automated communication process that has the aim to push your customers to update their payment information and pay their bill.
You decide:
how many emails will be sent out
how many days the process will wait between the different email sent outs and the end outcome.
Note
You can set up multiple dunning plans and refer to them when you set up a plan.
The setup of the process can be done in the Dunning Management interface. Let us ensure that you understand every aspect of this configuration at the end of this article.
Access to the dunning management interface
In order to access click on Configuration > Dunning Management on the navigation sidebar.

If you have not yet set up a dunning plan, you will see the default one when opening the interface.
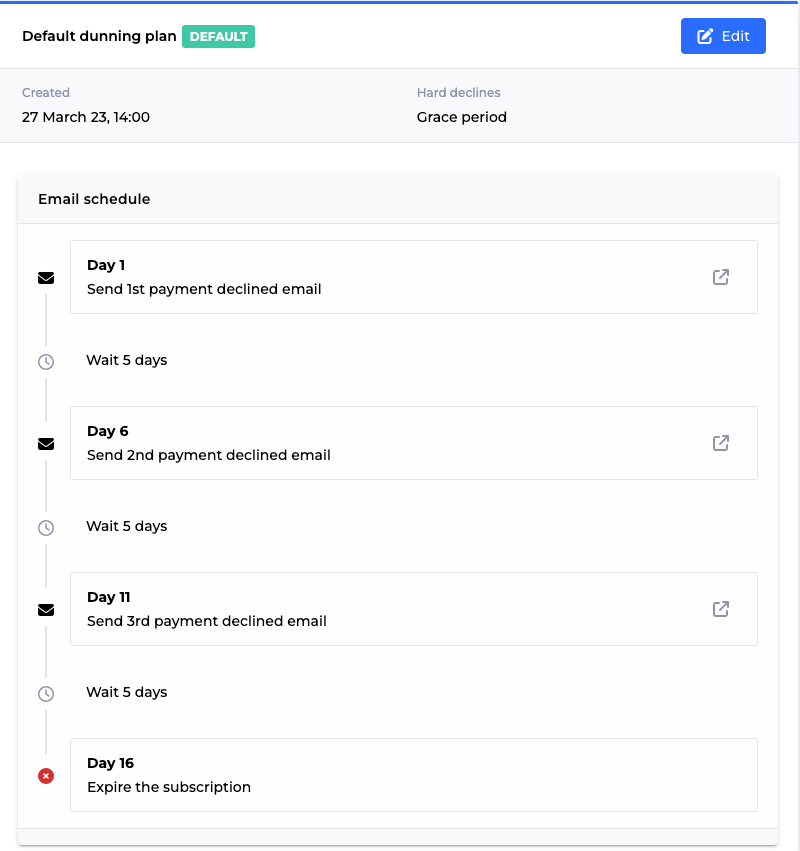
The default dunning plan
First of all, we will have a closer look on the structure of the plan you already see on the page.
 | Header including > Created: Date, when the dunning flow started. > Hard declines: it will show if you included a grace period or not*. |
Email schedule: Showing the days of the reminder sent out and the waiting intervals. You can define four dunning levels, including as a last step the expiration of the subscription. |
By clicking on  you will be redirected to the Email Templates section of the Old Dashboard. This functionality will soon be available as well in the new interface.
Note
* A grace period is the period during which an overdue payment will not be dunned.
Create a new dunning plan
If you would like to create additional plans, you can click on  .
.
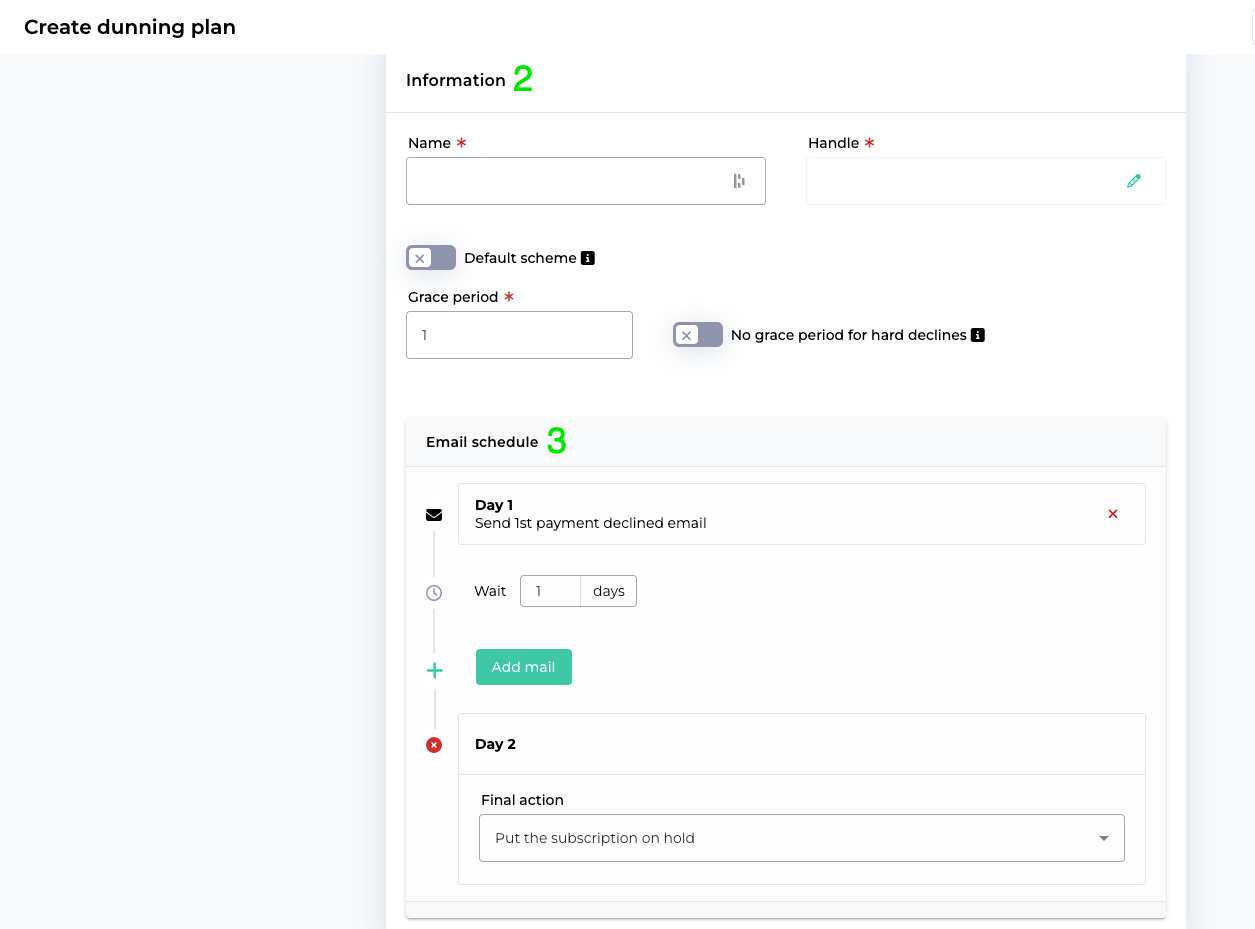
You will see a brand new dunning plan, that you can configure from A-Z.

Please refer to the Edit the default dunning plan section, especially step 2 and 3 for more details.
Note
Only difference:
The Handle field will automatically overtake the content of the Name field. If you prefer to change it, you can click on the  .
.
When you finished the configuration, click again on  to save your changes.
Delete a dunning plan
Note
You can only delete additional dunning plans. One default plan needs always to be configured.
Once you clicked on
 the button
  is available on the top right corner.
Confirm that you want to delete the plan by clicking on Delete.
A pop up will confirm the deletion of the plan.
Caution
Once you deleted your plan, you can not restore it again.
Creation of a one-time payment following your dunning flow
This guide shows you how to handle a one-time payment, which will go into your dunning process if it is not paid in time.
In order to set up a dunning process for a one-time payment, you need to create a customer first. If you have not done this by now, please read this article How to create a customer.
Please read this guide as a preparation: How to create a plan.
Great! Now you are prepared, since this guide is very straight forward. Let us start directly with the configuration.
Create a new plan:
We suggest to call it Manual.
Set the Price in the Pricing box to 0.
Set the Billing scheduling type in the Billing box to Manual on-demand.
The subscription we will create later will not be renewed since this plan is created with a scheduling type Manual.
Note
The plan can also be created via API: https://optimize-docs.billwerk.com/reference/createplanjson.

Create a customer or ensure that it is created.
Add the plan to the customer :
Click on Create Subscription on the Customer Details page.
Choose the plan Manual.
Choose in the Payment option box the option Hosted Page.
Click on
 .
.Copy the Payment link you receive in the pop up window by clicking on
 .
.Note
Send this link to your customer in an email saying “Here you can save your card for paying invoices later on".
Note that it is only customers with no card saved, that need to go through the process of saving their card.
The creation of the subscription can also be done by API: https://reference.reepay.com/api/#create-subscription.
Stay on the Subscription Details page. Click on Create Invoice which leads you to the Charge Subscription screen.
Select Automatic in the Charge Options.
In the Invoice options box activate the Include switch for creating Order lines.
Note
In order to create invoices for this subscription, you can also use the API https://optimize-docs.billwerk.com/reference/createsubscriptioninvoice.
If your customer already added a payment method, then you do not need to continue with the next step.
Go back to the Customer Details page and set a Payment Method by clicking on Add payment method.
Select Online transaction, which will settle the amount instantly and send a receipt to the customer.
Great job! If the settle cannot be carried out, the invoice will go into the dunning flow since it's created under the subscription.
Synchronize with an ERP system for invoice sent out
Learn how to conduct a simple integration between Billwerk+ Pay / Billwerk+ Optimize and your ERP system to send invoices from your ERP to your customers.
Caution
This guide addresses developers or administrators having a general technical understanding. You need to know what APIs and web hooks are.
You will need to build a middleware between Billwerk+ Pay / Billwerk+ Optimize and your ERP system to communicate with both systems.
Create two dunning plans. One dunning plan for card payments and one dunning plan for invoice payments.
The dunning plan for invoice payments
must not send out any mails
and the Final action is set to Keep subscription active.
Put the Grace period
to the number of days your customers have to pay the invoice that is sent from your ERP system.
Create two plans.
The first plan: for customers who would like to pay by card.
The second plan: for customers who would like to pay by invoice.
Set the corresponding dunning plan on each plan.
Subscribe to web hooks from your Billwerk+ Pay/ Billwerk+ Optimize account.
You can insert your web hook URL in the Webhook interface.
Wait for an invoice_created web hook.
When you receive the webhook call the get_invoice API and look at the plan argument.
Here you will find the plan_handle.
Look up the plan handle by calling the get_plan API .
Check if the plan is the invoice plan you made earlier.
Note
You could also store the plan handles instead of calling Billwerk+ Pay each time.
If the plan_handle matches the plan you made for invoice payments, you can create an invoice in your ERP system and send out an invoice to the customer.
Now call manual_settled to set the correct status on the invoice created in Billwerk+ Pay/ Billwerk+ Optimize*.
You can choose bank_transfer under the method argument.
The invoice will now have status settled in Billwerk+ Pay/ Billwerk+ Optimize and paid by bank transfer.
Note
* If your ERP system can notify you when the customer has actually paid the invoice, you have to wait to call the manual_settle API until your ERP system has told you that the invoice has been paid. In this way, both systems will be fully synchronized.