Payment Methods
What is a payment gateway? Why do I need a merchant account at an acquirer?
A payment gateway or Payment Service Provider (PSP) is a service that processes credit card payments for online merchants.
Payment gateways facilitate transactions by transferring key information between payment windows and the front end processor/bank.

Learn everything about the setup of the different payment methods in Billwerk+ Payments.
Credit cards
Available Third Party Card Acquirers
You have an existing agreement with an acquirer? We support several different third party acquirers operating in many different countries.
Looking at the sidebar navigation on the left side of your screen, under Configuration  Payment Methods you will find Payment Methods.
When you click now on Credit card in the Cards box:

you find the list of Third party card acquirers:
Acquirer | Popular | Link to homepage | Link to our documentation |
|---|---|---|---|
Clearhaus | in Europe | ||
Nets | in Europe | ||
Elavon | globally | ||
Swedbank Pay | in Scandinavia | ||
Worldline | in Europe | ||
Worldline Evry | globally | ||
Valitor | in Europe |
The payment_method argument
This guide informs you how our payment_method parameter is working
You can use the parameter payment_methods (part of the Checkout Payment Methods) to set by default a payment method that will be shown to your customer in the checkout window.
Note
If you do not include this parameter in your call to Billwerk+, all available payment methods, the merchant activated on the account will be shown.
Example:
You configured a Pay with Mobilepay Online button on your own site.
Then you create the session with payment_methods: mobilepay.
Billwerk+ will then direct the customer directly to Mobilepay Online.
You can see this as a live example on our customer bandageshoppen.dk.
Acquiring agreements - Acceptations of cards
It is your acquirer agreement(s) who are actually controlling/determining which cards you can accept.
Sign up for an acquirer agreement.
Example: You have two acquirer agreements. One with NETS for Dankort / Visa-Dankort and one with Clearhaus for the rest of the cards like VISA / Mastercard.
Configure which cards you would like to accept:
Go to Configuration → Payment Methods.
Click into the Cards box on Credit card.
Go the Acquirer you set up and select the Payment methods you would like to set up for your acquirer.
Note
If you use the payment method card as a wildcard you can accept all your supported cards through your acquirers.
But regardless of the cards you have activated on your acquirer agreement, you are able to overwrite the selected cards by using the payment method parameter.
This example from a session shows how you 'limit' the cards you can accept to:
"payment_methods": ["dankort","visa","visa_dk","mc"],
Example:
Your customer tries to pay with a VISA Electron visa_elec.
The error: Card number does not match any of the permitted card types will pop up, since you have limited the pay types, even though VISA Electron is activated on the Clearhaus agreement.
Card acquiring through Billwerk+ Pay
If you would like to get an acquiring agreement from Billwerk+, you can apply for one by using this application.
If you have an existing acquiring agreement, please follow these steps:
Go to Configuration > Payment Methods.
Click on Credit cards.
In the Card acquiring through Reepay box:
Click on
 to add more agreements.
Activate the switch to Select all cards or select manually the cards you would like to include.
Click on Advanced to:
Add a Comma separated currency list in the Choose currencies box.
Use the Payment Methods drop down list to Choose payment methods.
Use all Payment Methods
Select which payment method to use
Activate the switch Select all to select all gateways.
Or pick manually gate ways.
In the Strong customer authentication box activate:
3D Secure
Note
Additional security layer providing strong customer authentication (SCA) for online credit and debit card transactions. Also known for example as Verified By VISA, Master Securecode and SecurePay. 3D Secure gives you as a merchant liability shift in some cases, contact your acquirer for more information.
3D Secure for recurring
Note
You can also enable 3D Secure for preauths meaning that there is strong customer authentication when a recurring payment method is created. Whether this results in liability shift in subsequent transactions is depending on the acquirer. Contact your acquirer for more information.
Once you activated 3D Secure for recurring you can also:
Disallow 3D Secure attempted
Note
If a card issuer, e.g. cardholder bank, does not support 3D Secure, but the card is enrolled, the result of the 3D Secure flow will be "attempted". The cardholder will not be prompted for any authentication, but normally the attempted result will also mean liability shift. Use this setting to disallow attempted as sufficient 3D Secure authentication.
Require SCA by default
Note
When creating a payment or signup session, the SCA requirement can be defined using parameters. If no specific 3D requirement is used the default is to use 3D Secure if a card is enrolled, but also accept un-enrolled cards. Use this toggle to change the default so SCA is required in the default case.
When you finished your configuration, click on
 .
.
Card Acquirer Clearhaus
Clearhaus is an acquirer and financial institution across 33 countries.
Caution
Please be aware of these prerequisites before starting the setup.
To follow this procedure you need to be already live with Billwerk+ Payments. It will not work in test mode.
Please set up a Clearhaus account first > Create your account.
In this article you will find
a procedure how to set up Clearhaus in Billwerk+ Payments.
a procedure how to check Settlements & Transactions in the Clearhaus dashboard.
Set up the acquirer in Billwerk+ Pay
First of all, let us have a look on the configuration.
Note
Once the application has been submitted all further communication in regard to the acquirer application will be between the you and Clearhaus.
Looking at the sidebar navigation on the left side of your screen, under Configuration
 Payment Methods you will find Payment Methods.
Click on Credit Card.

Click on Clearhaus.
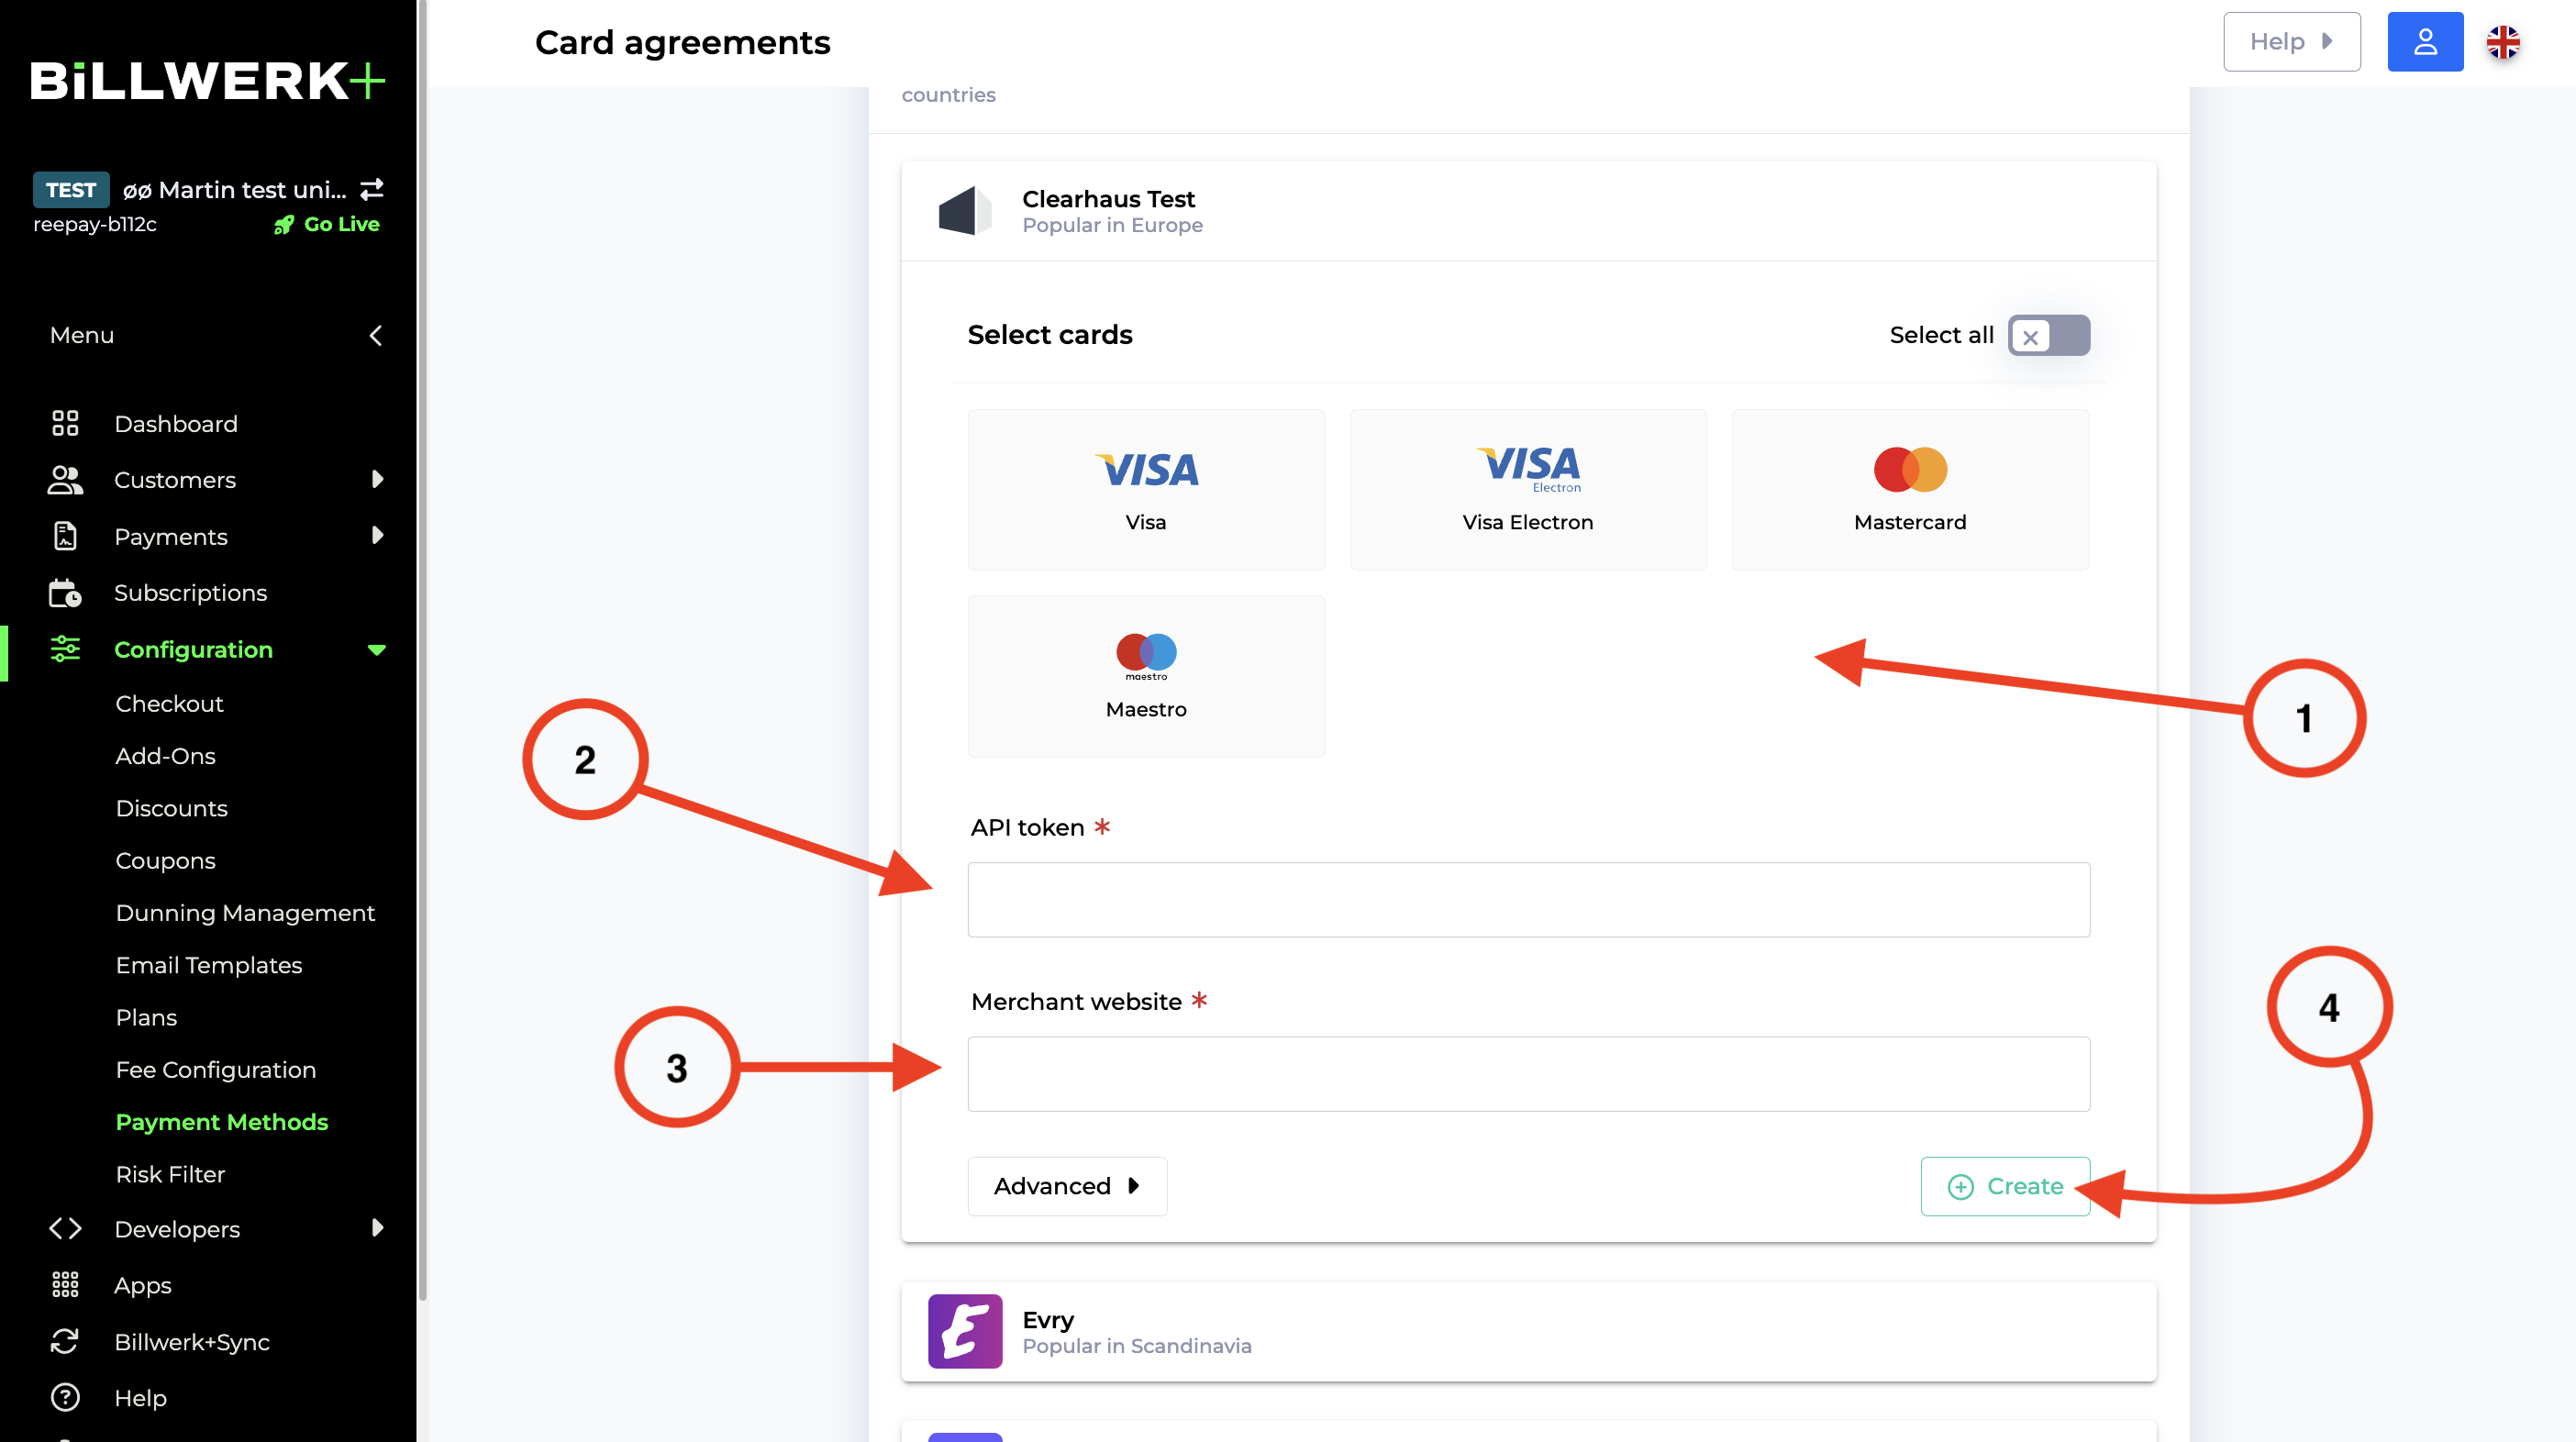
Select payment methods you would like to use.
Enter the Clearhaus API key (you can find it if you log in to your Clearhaus account).
Enter the URL for your web shop.
Click Create, Save, Done.
Well done! The setup is ready to be used.
Settlements & Transactions
We assume that you would like to reconcile the transactions that you have processed through Billwerk+ Payment. Depending on the acquirer, normally you can access a settlements section in the acquirer's dashboard.
For Clearhaus, you can navigate to Clearhaus Dashboard → Select merchant name → Settlements.

Once you have navigated to the Settlements section, you can search for the currency, period, payout dates as well as extracting the data in a .pdf, .xls or .csv format.
Card Acquirer Nets
Nets is the leading payment provider in the Nordics.
Caution
Please be aware of these prerequisites before starting the setup.
To follow this procedure you need to be already live with Billwerk+ Payments. It will not work in test mode.
Please set up a Nets account first > Contact Nets to set up an account.
Set up the acquirer in Billwerk+ Pay
First of all, let us have a look on the configuration.
Looking at the sidebar navigation on the left side of your screen, under Configuration
 Payment Methods you will find Payment Methods.
Click on Credit Card.

Scroll down and click on Nets.
Select payment methods you would like to provide to your clients.
Fill out the form:
Field
Information to put in
Merchant id
Your NETS TOF-NR, 7 digits, you get this information from NETS.
Merchant Name
Your company information
Merchant Address
Merchant City
Merchant ZIP code
Merchant Country
Business code
MCC code (Business code/branchekode)
Merchant website
Do not forget to put http://
3D Merchant ID
Your international TOF number, it is also provided by NETS.
Amex Merchant ID
American Express Merchant ID, if you have been receiving Paper statements, your Merchant Account number can be found at the top right corner of the statement. It is also included at the top right corner of any email sent to you from American Express regarding your Online Merchant Account.
Click on Create in the lower right corner.
Great! This setup is done.
Card Acquirer Elavon
Elavon is a payment provider since over 30 years and one of the global leaders.
Caution
Please be aware of these prerequisites before starting the setup.
To follow this procedure you need to be already live with Billwerk+ Payments. It will not work in test mode.
Please set up an Elavon account first > Get started with Elavon.
Set up the acquirer in Billwerk+ Pay
First of all, let us have a look on the configuration.
Looking at the sidebar navigation on the left side of your screen, under Configuration
 Payment Methods you will find Payment Methods.
Click on Credit Card.

Scroll and click on Elavon.
Select payment methods you would like to use.
Fill out the form as the following:
Field
Information to put in
Merchant id
Elavon Merchant ID, 8 digits. Elavon will provide you with this number.
Merchant Name
Your company information
Merchant Address
Merchant City
Merchant ZIP code
Merchant Country
Business Code
MCC code (Business code/branchekode)
Merchant website
Do not forget to put http://
3D Merchant id
Insert your Elavon Merchant ID again.
Amex merchant ID
American Express Merchant ID, if you have been receiving Paper statements, your Merchant Account number can be found at the top right corner of the statement. It is also included at the top right corner of any email sent to you from American Express regarding your Online Merchant Account.
Click on Create in the lower right corner.
Great! This setup is done.
Card Acquirer Swedbank Pay
Swedbank is a traditional Swedish bank providing all types of financial services.
Caution
Please be aware of these prerequisites before starting the setup.
To follow this procedure you need to be already live with Billwerk+ Payments. It will not work in test mode.
Please set up an XX account first.
Set up the acquirer in Billwerk+ Pay
First of all, let us have a look on the configuration.
Looking at the sidebar navigation on the left side of your screen, under Configuration
 Payment Methods you will find Payment Methods.
Click on Credit Card.

Scroll and click on Swedbank.
Select payment methods you would like to use.
Fill out the form:
Field
Information to put in
Merchant id
Nets TOF-nr (fictive TOF), 7 digits. Swedbank will provide you with this number.
Merchant Name
Your company information.
Merchant Address
Merchant City
Merchant ZIP code
Merchant Country
Business Code
MCC code (Business code/branchekode)
Merchant website
Do not forget to put http://
3D Merchant id
Swedbank Merchant ID (international TOF number)
Amex merchant ID
American Express Merchant ID, if you have been receiving Paper statements, your Merchant Account number can be found at the top right corner of the statement. It is also included at the top right corner of any email sent to you from American Express regarding your Online Merchant Account.
Click on Create in the lower right corner.
Great! This setup is done.
‹
Card Acquirer Worldline & Worldline Evry
Worldline Acquiring handles in-store and online payments across over 80 currencies.
Caution
Please be aware of these prerequisites before starting the setup.
To follow this procedure you need to be already live with Billwerk+ Payments. It will not work in test mode.
Please set up an Wordline account first. Click here to do so.
Set up the acquirer in Billwerk+ Pay
First of all, let us have a look on the configuration.
Looking at the sidebar navigation on the left side of your screen, under Configuration
 Payment Methods you will find Payment Methods.
Click on Credit Card.

Scroll and click on Worldline or Worldline Evry.
Select payment methods you would like to use.
Fill out the form:
Field
Information to put in
Merchant id
Your Nets TOF-nr (fictive TOF)
Merchant Name
Your company information.
Merchant Address
Merchant City
Merchant ZIP code
Merchant Country
Business Code
MCC code (Business code/branchekode)
Merchant website
Do not forget to put http://
3D Merchant id
Worldline Merchant ID
Amex merchant ID
American Express Merchant ID, if you have been receiving Paper statements, your Merchant Account number can be found at the top right corner of the statement. It is also included at the top right corner of any email sent to you from American Express regarding your Online Merchant Account.
Click on Create in the lower right corner.
Great! This setup is done.
‹
Card Acquirer Valitor
Valitor is a merchant services, acquirer, card issuer and payment gateway solutions company headquartered in Hafnarfjörður, Iceland.
Caution
Please be aware of these prerequisites before starting the setup.
To follow this procedure you need to be already live with Billwerk+ Payments. It will not work in test mode.
Please set up a Valitor account first. Please read their Getting Started help carefully.
Set up the acquirer in Billwerk+ Pay
First of all, let us have a look on the configuration.
Looking at the sidebar navigation on the left side of your screen, under Configuration
 Payment Methods you will find Payment Methods.
Click on Credit Card.

Scroll and click on Valitor.
Select payment methods you would like to use.
Fill out the form:
Field
Information to put in
Merchant id
Nets TOF number (fictive TOF)
Merchant Name
Your company information.
Merchant Address
Merchant City
Merchant ZIP code
Merchant Country
Business Code
MCC code (Business code/branchekode)
Merchant website
Do not forget to put http://
3D Merchant id
Your Valitor Terminal ID. Usually, it is 8 digits.
Amex merchant ID
American Express Merchant ID, if you have been receiving Paper statements, your Merchant Account number can be found at the top right corner of the statement. It is also included at the top right corner of any email sent to you from American Express regarding your Online Merchant Account.
Click on Create in the lower right corner.
Great! This setup is done.
‹
Authorization lifetime / Reservation on bank account
This article gives you a brief overview on how authorizations and reservations works.
An authorization via NETS/Swedbank/Elavon etc. does not actually expire, but the more days that go by between authorization and settle, the greater the risk that you will receive a refund with the reason late settle.
If the settle is made within 7-30 days, you will not receive such a refund. The longer you wait with the settle, the greater the uncertainty there is for unsuccessful settle.
If you are using Clearhaus as an acquirer the authorization will automatically expire after 179 days, meaning that it can't be settled after that.
Depending on the type of card, the amount is reserved for 7-30 days on your customer's account, when a successful authorization is carried out.
Note
Note that banks can not handle it if you as a merchant are trying to cancel a partial authorization. This means that your customer in most cases will have to wait for up to 30 days, for the authorization to expire.
There is nothing that you as a merchant or Billwerk+, can do to speed up the process.The customer may be successful in contacting his/hers bank.
For further clarification on this topic, we recommend that you have a talk with your specific acquirer.
Using an existing acquirer agreement when opening a second website
If the products sold in your new webshop are in the same category as the products sold in your current webshop and you want to receive your settlements from us in the same currency, you can use the existing agreement.
You simply need to send us an email with your new domain name. Remember to include your customer number (MID) or company name.
If the new webshop is selling products in a different category or if you wish to receive payments from the new webshop in a different currency you will need to make a new agreement with us.
Mobile Payments
You would like to improve conversion and reduce fraud on mobile? Here are the possible gateways you can provide for customers to pay with a stored card or balance.
Looking at the sidebar navigation on the left side of your screen, under Configuration  Payment Methods you will find Payment Methods.
Scroll down to the Mobile Payments section to find this list:
PSP / Gateway | Popular | Link to the homepage | Link to our documentation |
|---|---|---|---|
MobilePay Online | in Denmark & Finland | ||
MobilePay Subscriptions | in Denmark & Finland | ||
Apple Pay | globally | ||
Vipps | in Norway | ||
Vipps Recurring | in Norway | ||
PayPal | globally | ||
Swish | in Sweden | ||
Google Pay | globally |
Activate MobilePay Online
MobilePay is a digital wallet for iOS and Android that can be used for person to person transfers, in-store purchases, subscriptions, invoices, eCommerce transactions etc.
MobilePay Online is essentially a way for the user to accept eCommerce / Online payments in the MobilePay app. When the user accepts the payment, their card data is transferred to the PSP who can then do the authorization towards the acquirer chosen by the web shop.
Summary
This article will show you
explain how you set up MobilePay Online as only payment method and
show you what the customers see at checkout.
explain how to trouble shoot redirect issues.
Configure MobilePay Online
Looking at the sidebar navigation on the left side of your screen, under Configuration
 Payment Methods you will find Payment Methods.
Click on MobilePay Online.
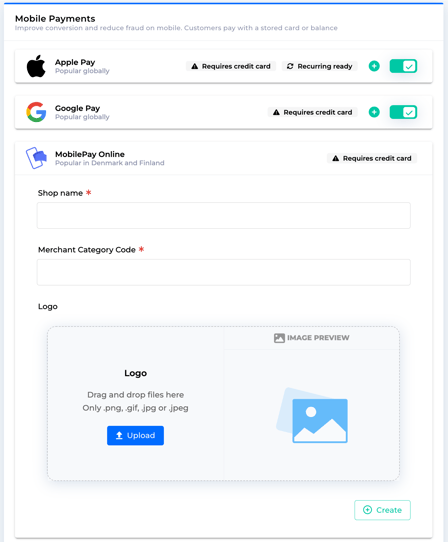
Enter the display name of your shop in the Shop name field.
Insert your 4-digit Merchant Category Code (MCC) in the Merchant Category Code field. The Merchant Category Code can be found on your acquiring agreement.
Optional: Upload your company logo. This logo will be displayed when your customer opens the MobilePay App.
Click on Create on the bottom right corner.
Note
If you have an active MobilePay Online and you want to change the logo, you have to delete the agreement and create it again.
MobilePay Online as the only payment
It is possible to set up MobilePay as your only payment method, follow these steps.
Activate your acquirer, for specific acquirer click the corresponding link :
Activate MobilePay Online - See the first procedure of this article.
Go to your acquirer agreement and set it up:
Click on Configuration in the menu bar to your left.
Click on Payment Methods.
Then click on Credit Card.

Click on your acquirer and click on the Advanced button at the bottom.
Under Choose Payment methods click the dropdown menu and choose Select which payment methods to use.
Select MobilePay and click on Save.
MobilePay during Checkout
When a customer chooses MobilePay a payment session will be initialized, the customer will be prompted with the MobilePay option through Billwerk+ Pay checkout. When the customer clicks on Continue the session will be redirected to MobilePay Online.
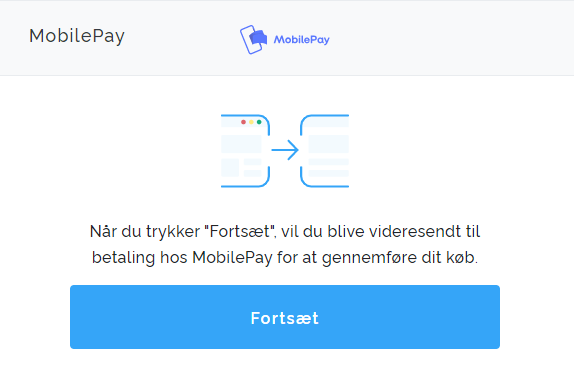
After the redirect has taken place, the customer will be prompted with the MobilePay Online notification on their device after they have entered their mobile number. There will be a 5-minute timer to complete this purchase, if this time elapses the transaction will be canceled and the session shall expire.
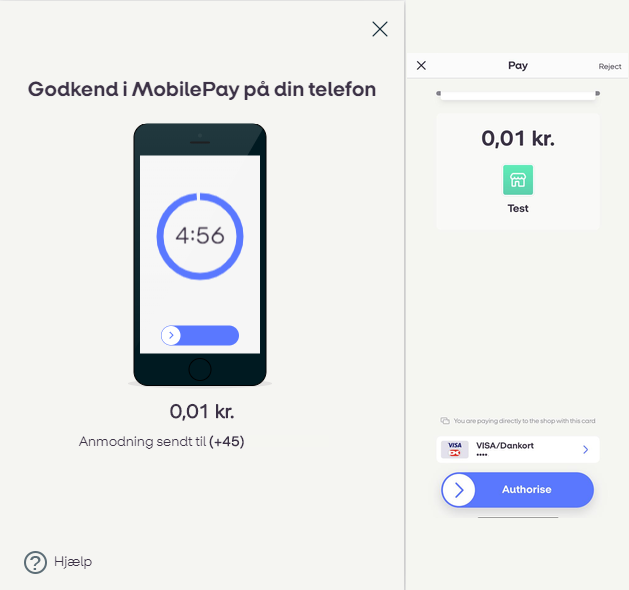
After the customer has approved the purchase, with a successful response of payment this can be considered complete, but like most other transactions your capture of the payment is needed to settle the transaction.
Trouble Shooting Redirect
When doing a payment on a mobile device, the telephone will switch from the browser to the MobilePay app.
When the payment is authorized, the MobilePay app will usually switch back to the browser.
Sometimes, this redirect might fail:
Phone runs out of battery.
Phone rings (receives mail/SMS, etc.) and customer does not return to browser.
Wifi or phone signal is lost.
User closes/locks their device and does not return until later.
iPhone user is redirected back to the Safari browser but started the payment in another browser.
User creates a session on their desktop computer, after they complete payment on their phone they close their browser after the authorization is made.
We recommend that you do not rely solely on the redirects and instead also make use of web hooks/callbacks for detecting payments. This way you can avoid issues that come with these unlikely scenarios.
Activate MobilePay Subscription
MobilePay Subscriptions is MobilePay’s service for receiving recurring payments.
In this article you will learn
Configure MobilePay Subscription
Caution
Before setting up MobilePay Subscriptions in Billwerk+ you need a MobilePay Subscriptions agreement with MobilePay.
If you don't have an agreement with MobilePay or an account at admin.mobilepay.dk follow this link.
If you already have a MobilePay account on admin.mobilepay.dk follow this link.
Before starting make sure you have Super Manager privileges as a MobilePay user.
Note
Be sure your MobilePay Subscription agreement has MPS One-off auto reserve enabled. Please verify this with MobilePay.
Looking at the sidebar navigation on the left side of your screen, under Configuration
 Payment Methods you will find Payment Methods.
Under Mobile Payments click on MobilePay Subscriptions.
Enter the following information:
Display name of your shop.
Merchant VAT Number (format should be: DK12345678).
Choose currency
Click on Create in the right bottom corner.
This will redirect you to the MobilePay Portal where you should log in using your MobilePay credentials.
Click on Allow to let Billwerk+ Pay access MobilePay Subscriptions. You will then be redirected back to our dashboard.
If your MobilePay Subscriptions have more than one provider (e.g. multiple brands) you will have to choose the correct one. Most merchants will only have one acquirer and this will be selected automatically.
You have now successfully set up a new MobilePay Subscriptions agreement on your Billwerk+ account.
Note
If you would like to have details about the technical integration, please follow this link.
Display your logo in the MobilePay App
It is possible to get your company logo visible in the MobilePay app. This can generate more transactions to your website.
Create and activate a MobilePay Subscriptions agreement in the Billwerk+ Payments Dashboard.
Insert your logo and link it on the MobilePay App.
Verify everything works and do a test payment.
Contact our support team. Then MobilePay's team can then enable the Merchant in the app.
Once the customer clicks the logo, the customer will be prompted to go to the homepage of the merchant.
Activate Apple Pay
Apple Pay is a mobile payment service by Apple Inc. that allows users to make payments in person, in iOS apps, and on the web. It is supported on iPhone, Apple Watch, iPad, and Mac. It digitizes and can replace a credit or debit card chip and PIN transaction at a contactless-capable point-of-sale terminal.
In this article you will learn
Apple Pay Setup
Caution
Apple Pay will only be shown on Apple devices in the Safari browser and when a card has been added as a payment method to Apple Pay.
Looking at the sidebar navigation on the left side of your screen, under Configuration
 Payment Methods you will find Payment Methods.
It is really easy to get started with Apple Pay if you have a card acquiring agreement.
Under Mobile Payments click on Apple Pay.
Enter the name of your shop in the Display name field.
Click on Create.
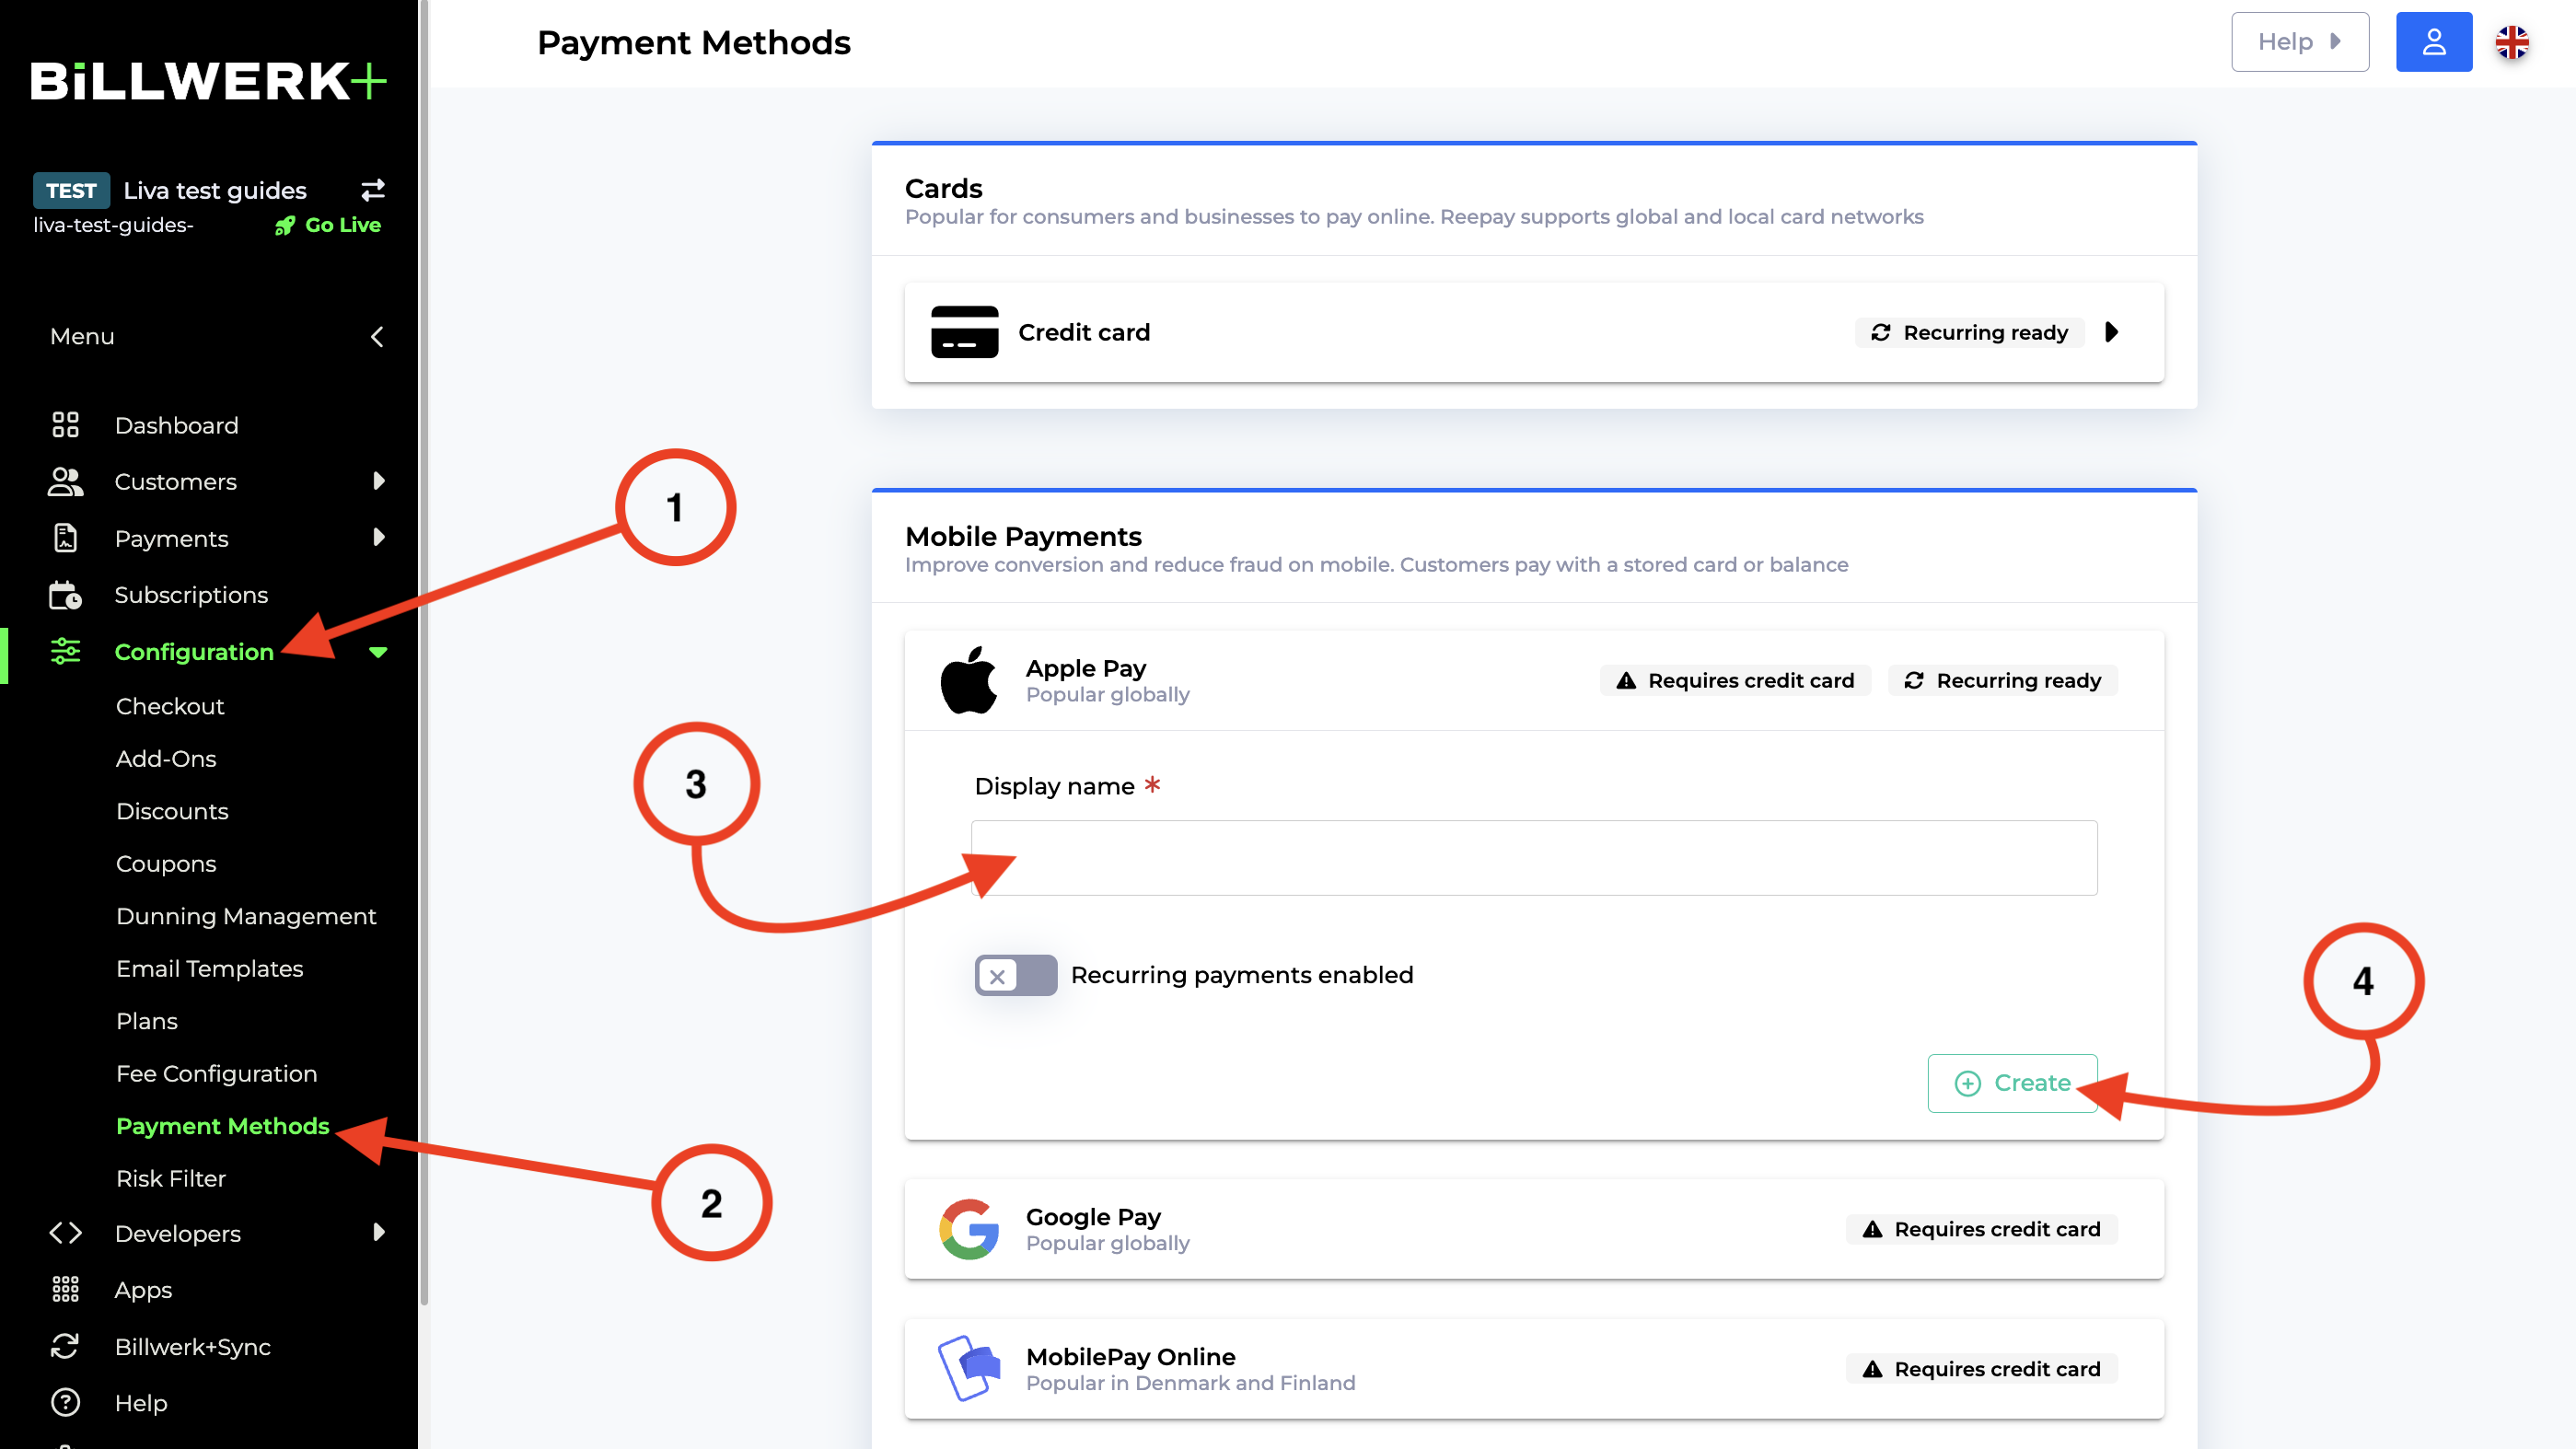
If you want to use Apple Pay for recurring transaction, activate the Recurring switch before clicking on Create.
Well done! You just activated Apple Pay for your customers.
Trouble Shooting: Why does Apple Pay not show up?
If Apple Pay does not show up in your checkout, check if the following conditions are true:
You have to run it on a supported device with the latest version of iOS and a supported Browser.
You need to be in a supported country or region
Activate Vipps or Vipps Recurring
Vipps is a Norwegian mobile payment application designed for smartphones developed by DNB.
Caution
To get started with Vipps payments, you need to have a Vipps account. If you do not have an account yet, you can apply for one here.
Login to your Vipps account.
Get your Merchant serial number.
Log into your Billwerk+ Pay Admin.
Looking at the sidebar navigation on the left side of your screen, under Configuration
 Payment Methods you will find Payment Methods.
Under Mobile Payments click on Vipps.
Enter the Merchant serial number for your shop.
Click on Create.
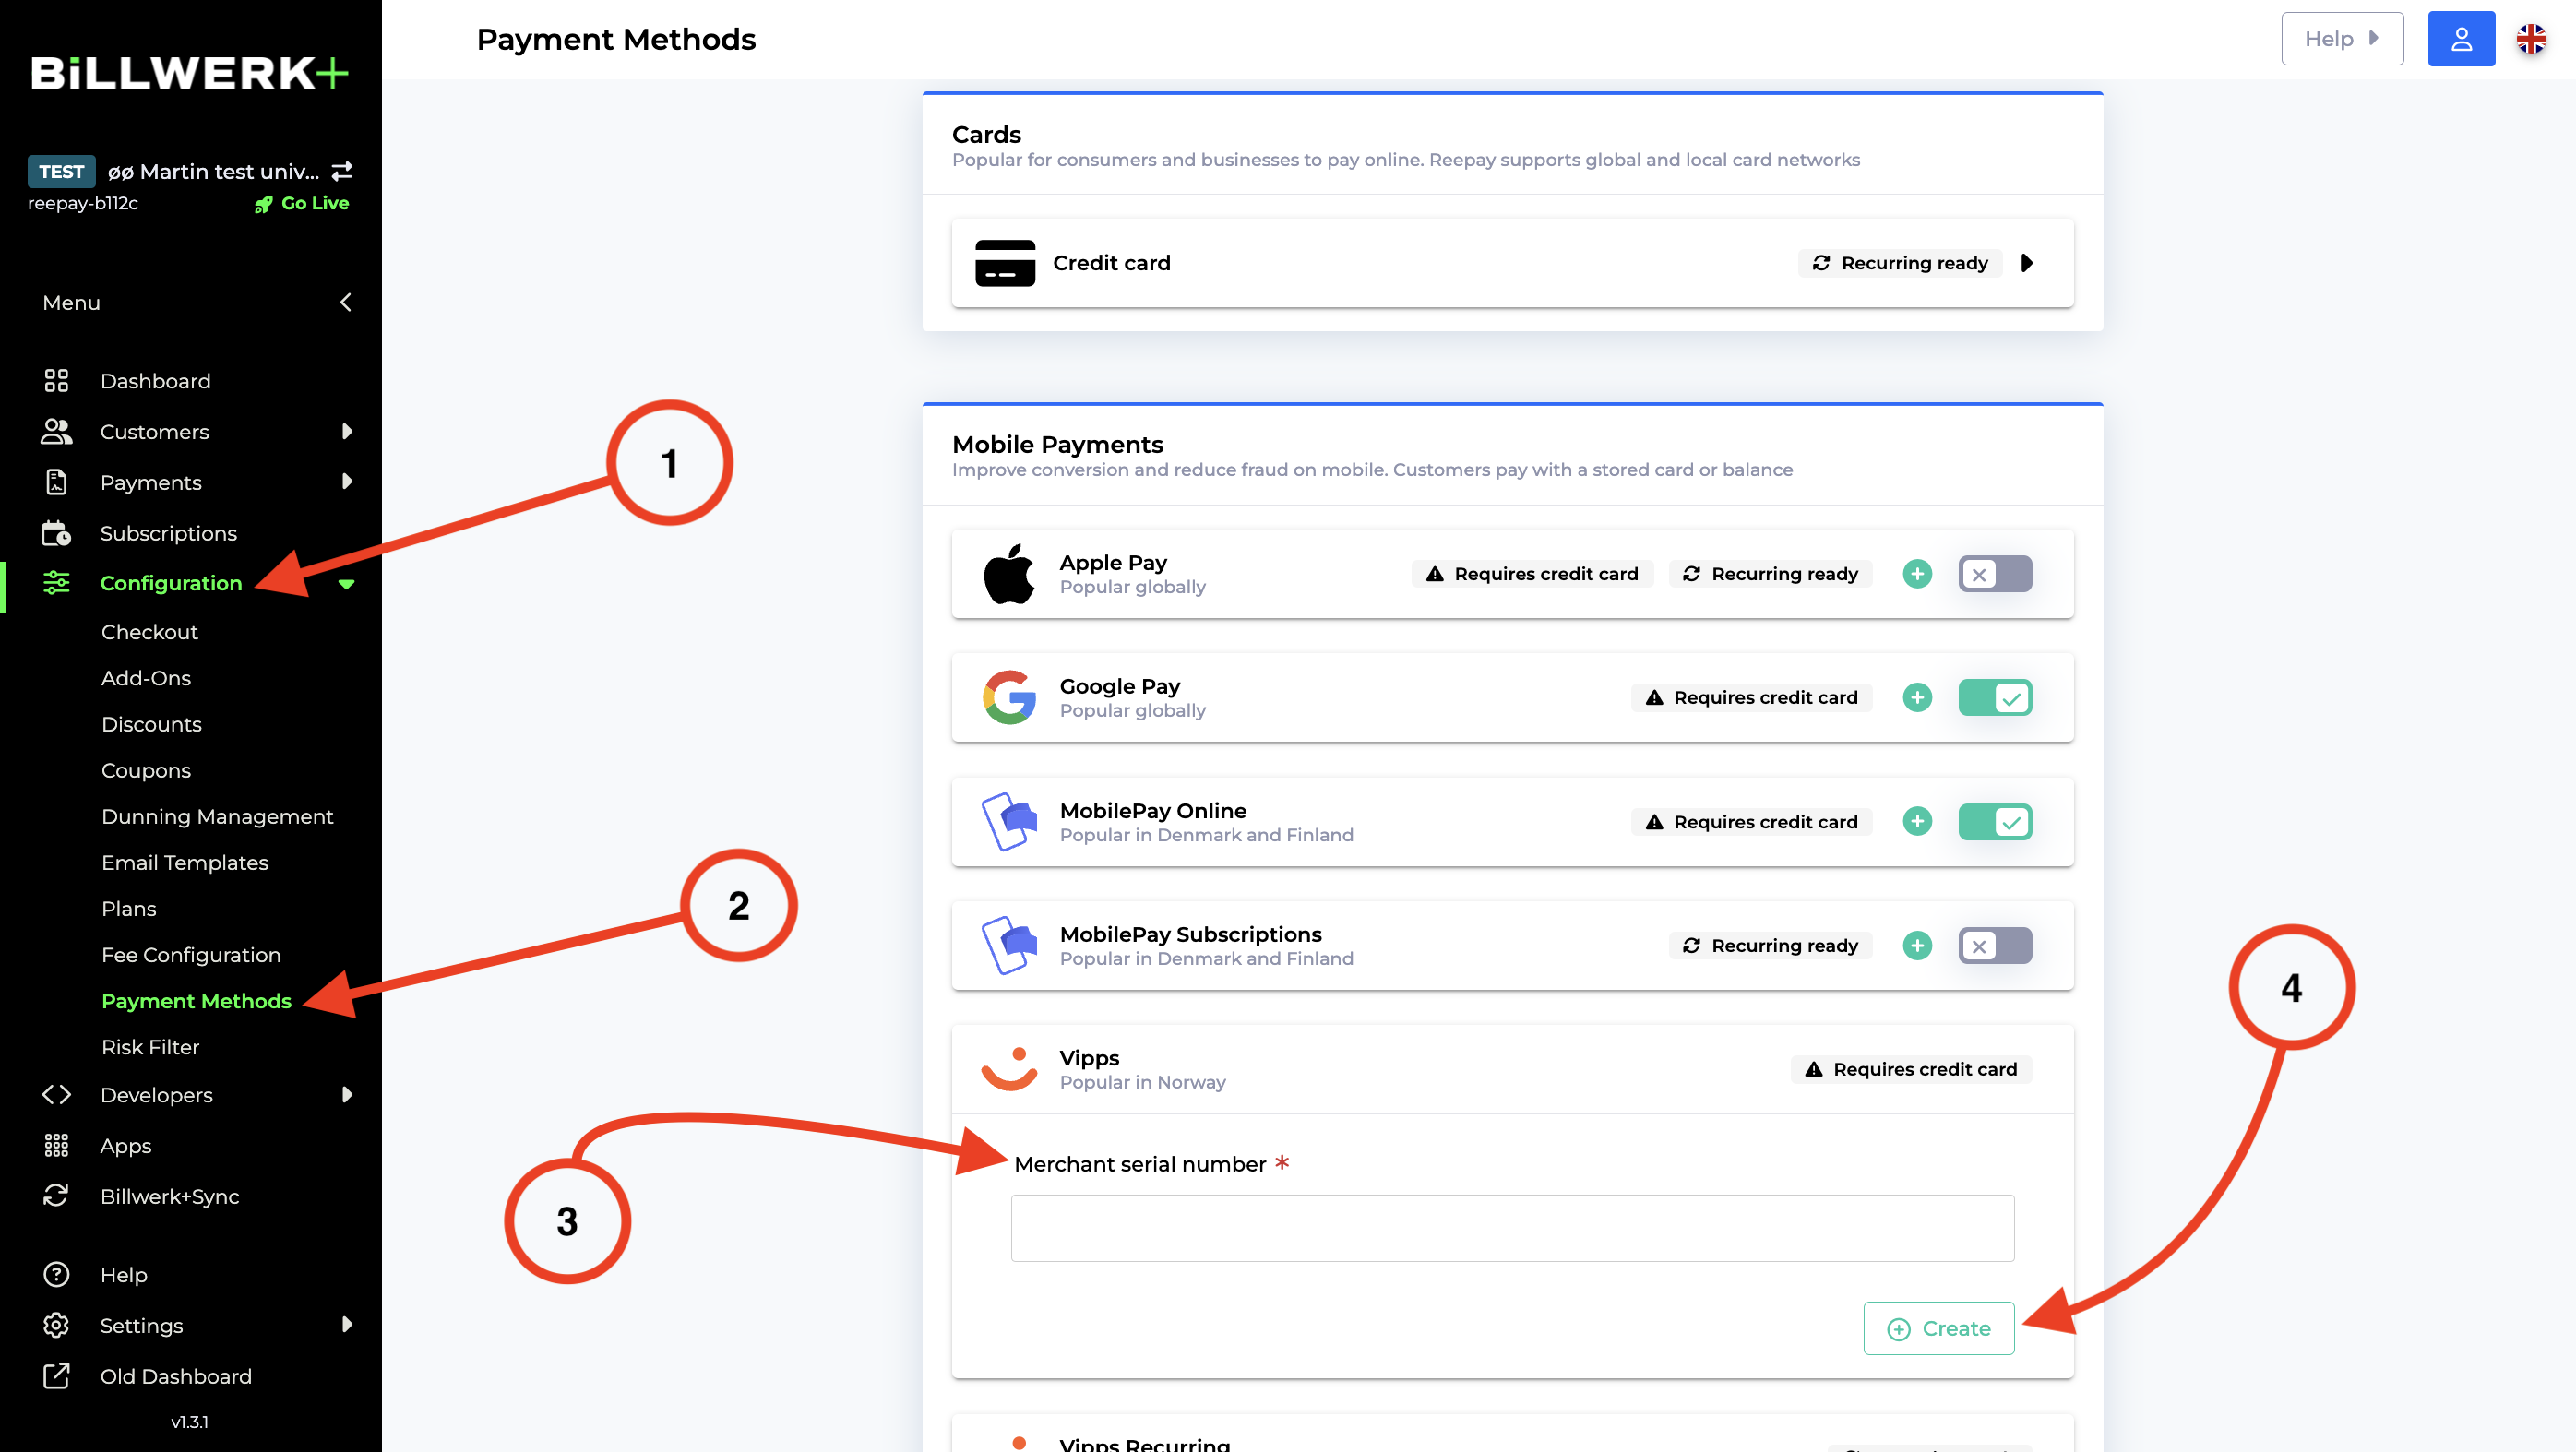
For Vipps Recurring please choose Vipp Recurring instead of Vipps in step 5.
Activate PayPal
PayPal Holdings, Inc. is an American multinational financial technology company operating an online payments system in the majority of countries that support online money transfers, and serves as an electronic alternative to traditional paper methods such as checks and money orders. The company operates as a payment processor for online vendors, auction sites and many other commercial users, for which it charges a fee.
Caution
To get started with PayPal payments, you need to have a PayPal Business account. In order to get an account, please sign up and follow their instructions.
Setup PayPal
To setup PayPal in your B+Pay account you need to follow the following steps: Setup your PayPal agreement in B+Pay
Activate Swish
Swish is a mobile payment system in Sweden. The service was launched in 2012 by six large Swedish banks, in cooperation with Bankgirot and the Central Bank of Sweden.
The first thing you need to do is to get a Swish agreement with one of these Swedish banks that support Swish payments.
These banks are currently supporting Swish:
Danske Bank
Nordea
SEB
Swedbank
Handelsbanken
Caution
You will need a Swedish bank account in order to get a Swish agreement.
Once you have a Swedish bank account:
you should choose a District
and get a new Swish trade number, if you do not have any yet.
At this point, you will have the choice between
being responsible for a certificate (CPOC - Certificate Point Of Contact) or
rely a technical supplier and his certificate.
Caution
Please choose to use a technical supplier, namely Billwerk+.
Once you got your Swish trade number, you will need to activate Swish in our application.
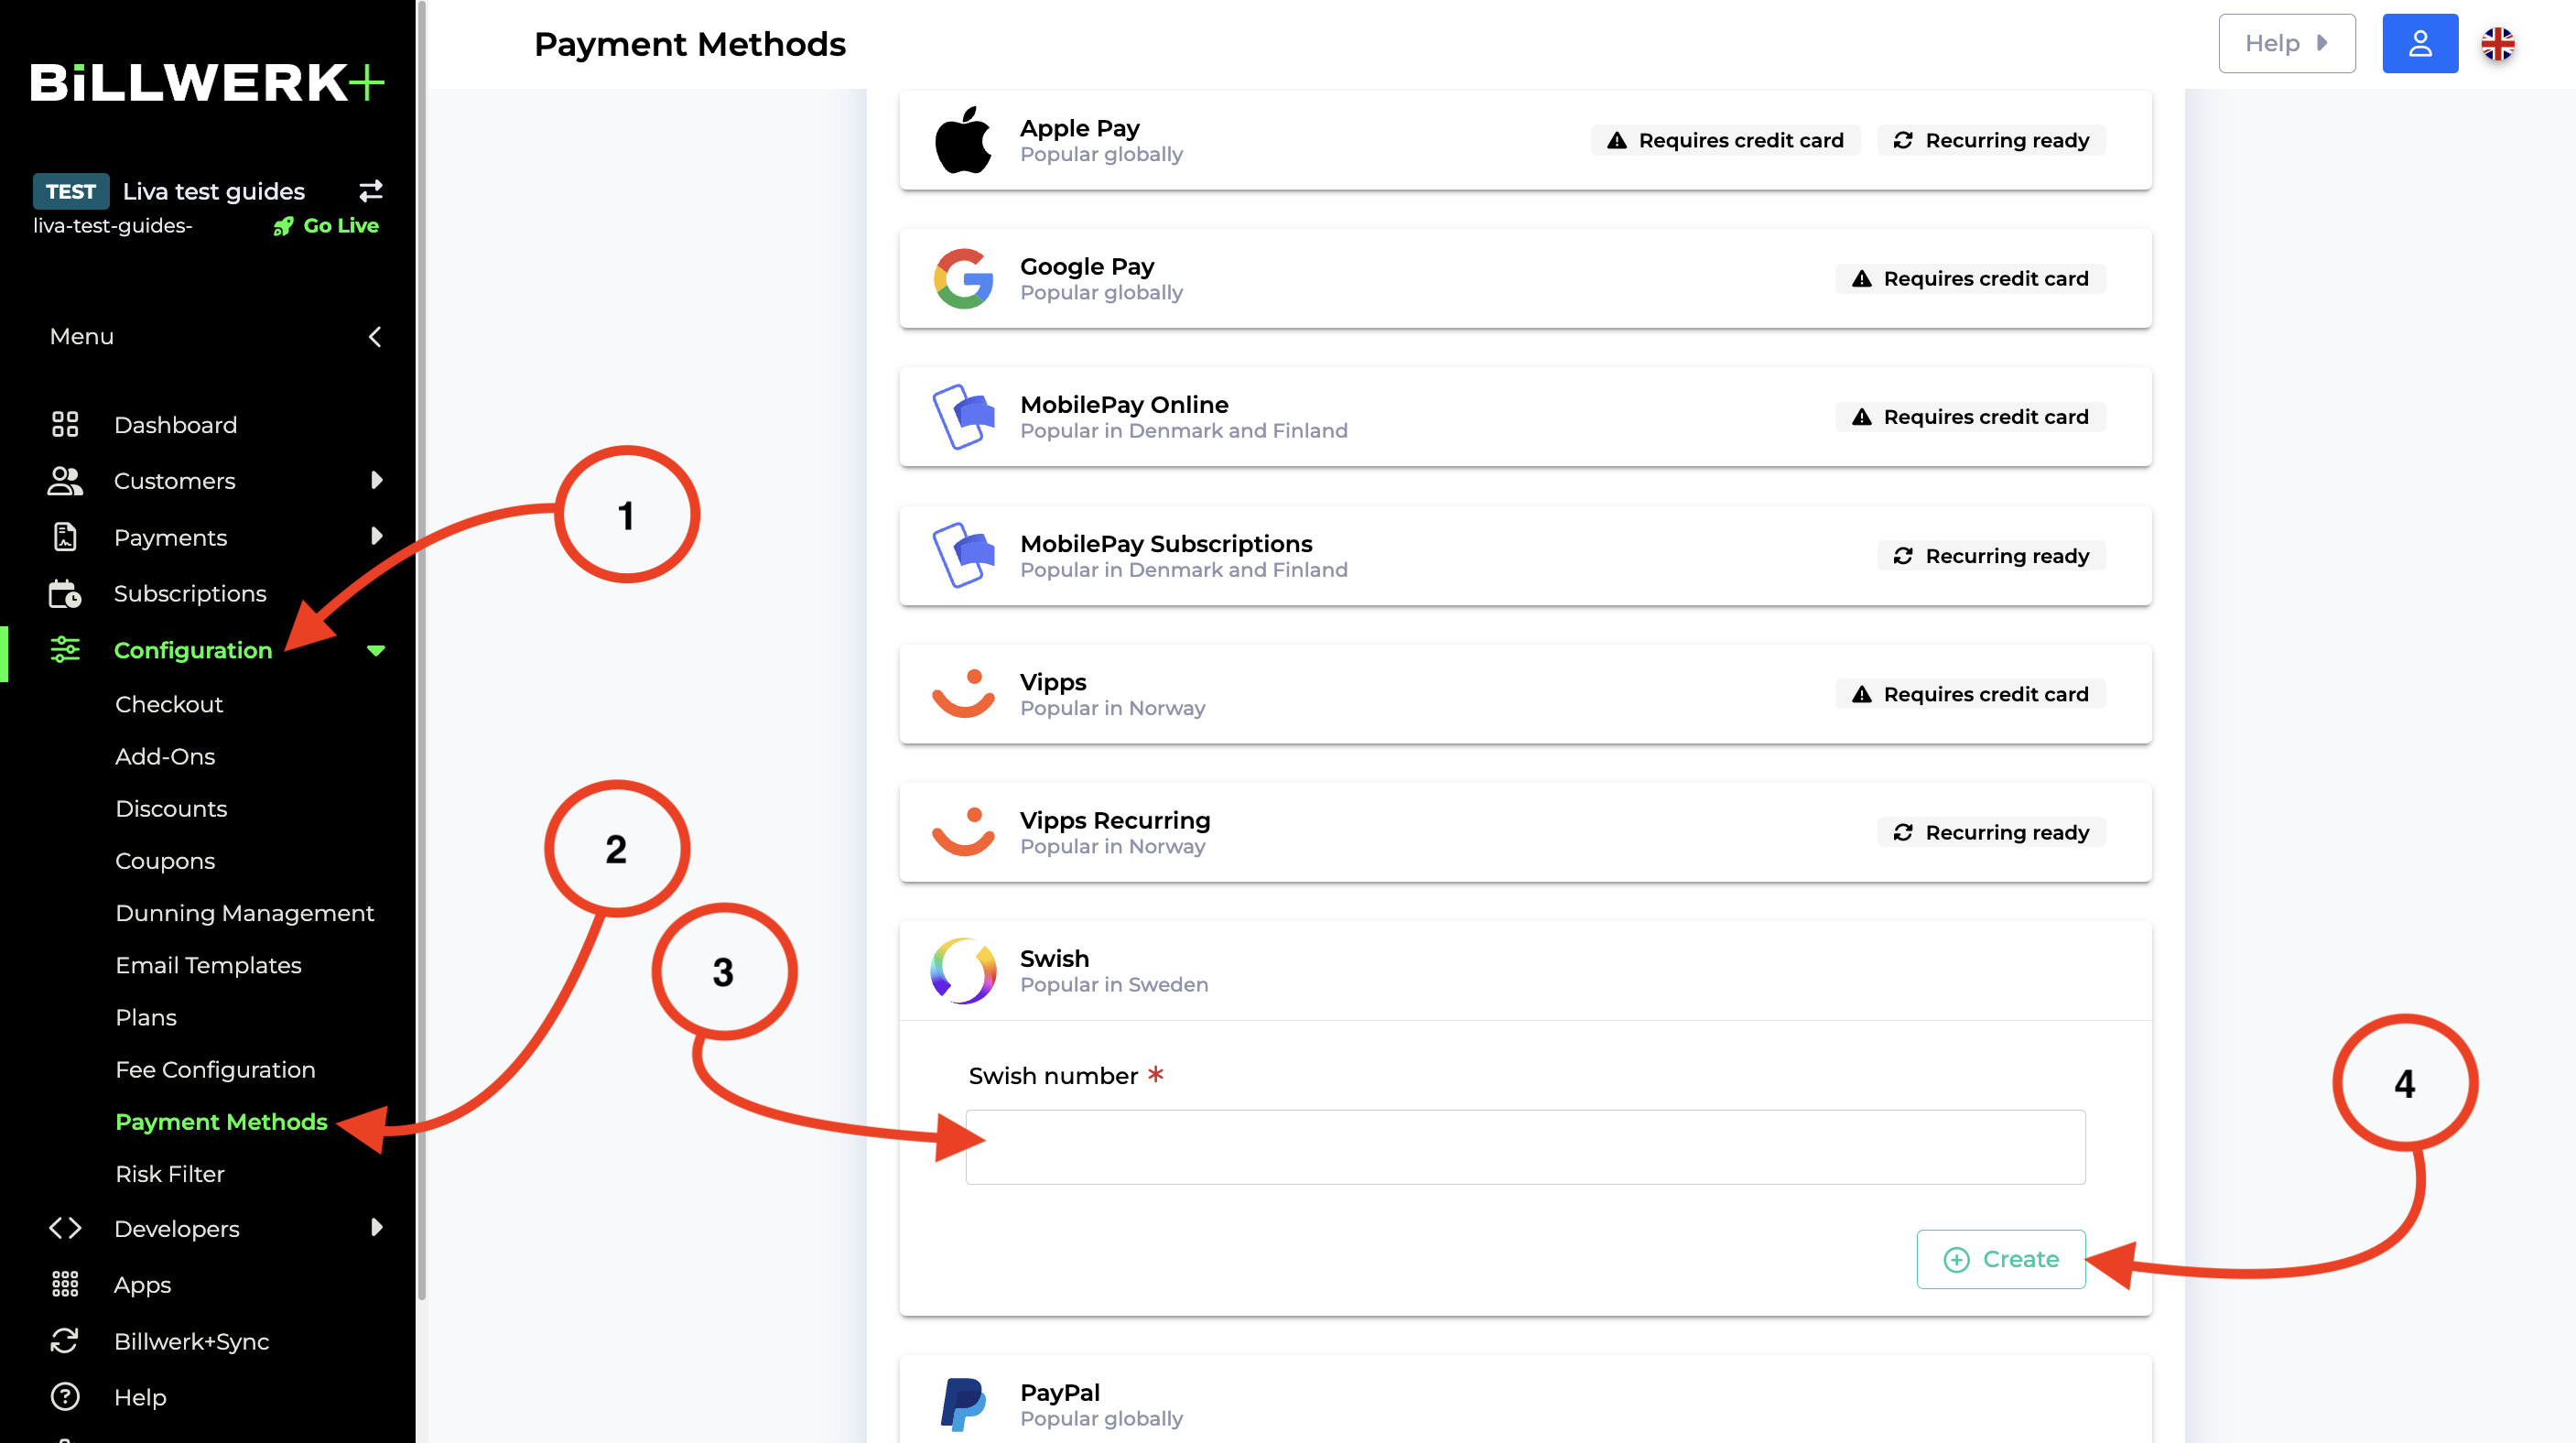
Looking at the sidebar navigation on the left side of your screen, under Configuration
 Payment Methods you will find Payment Methods.
Under Payment Method click on Swish.
Fill in your Swish trader number in the Swish number field.
Click on Create.
Activate Google Pay
Google Pay is a mobile payment service developed by Google to power in-app, online, and in-person contactless purchases on mobile devices, enabling users to make payments with Android phones, tablets, or watches.
In this article you will get
Set up Google Pay
It is really easy to get started with Google Pay.
Note
Google Pay will only be shown on Android devices in the Chrome browser and when a card has been added as a payment method to Google Pay.
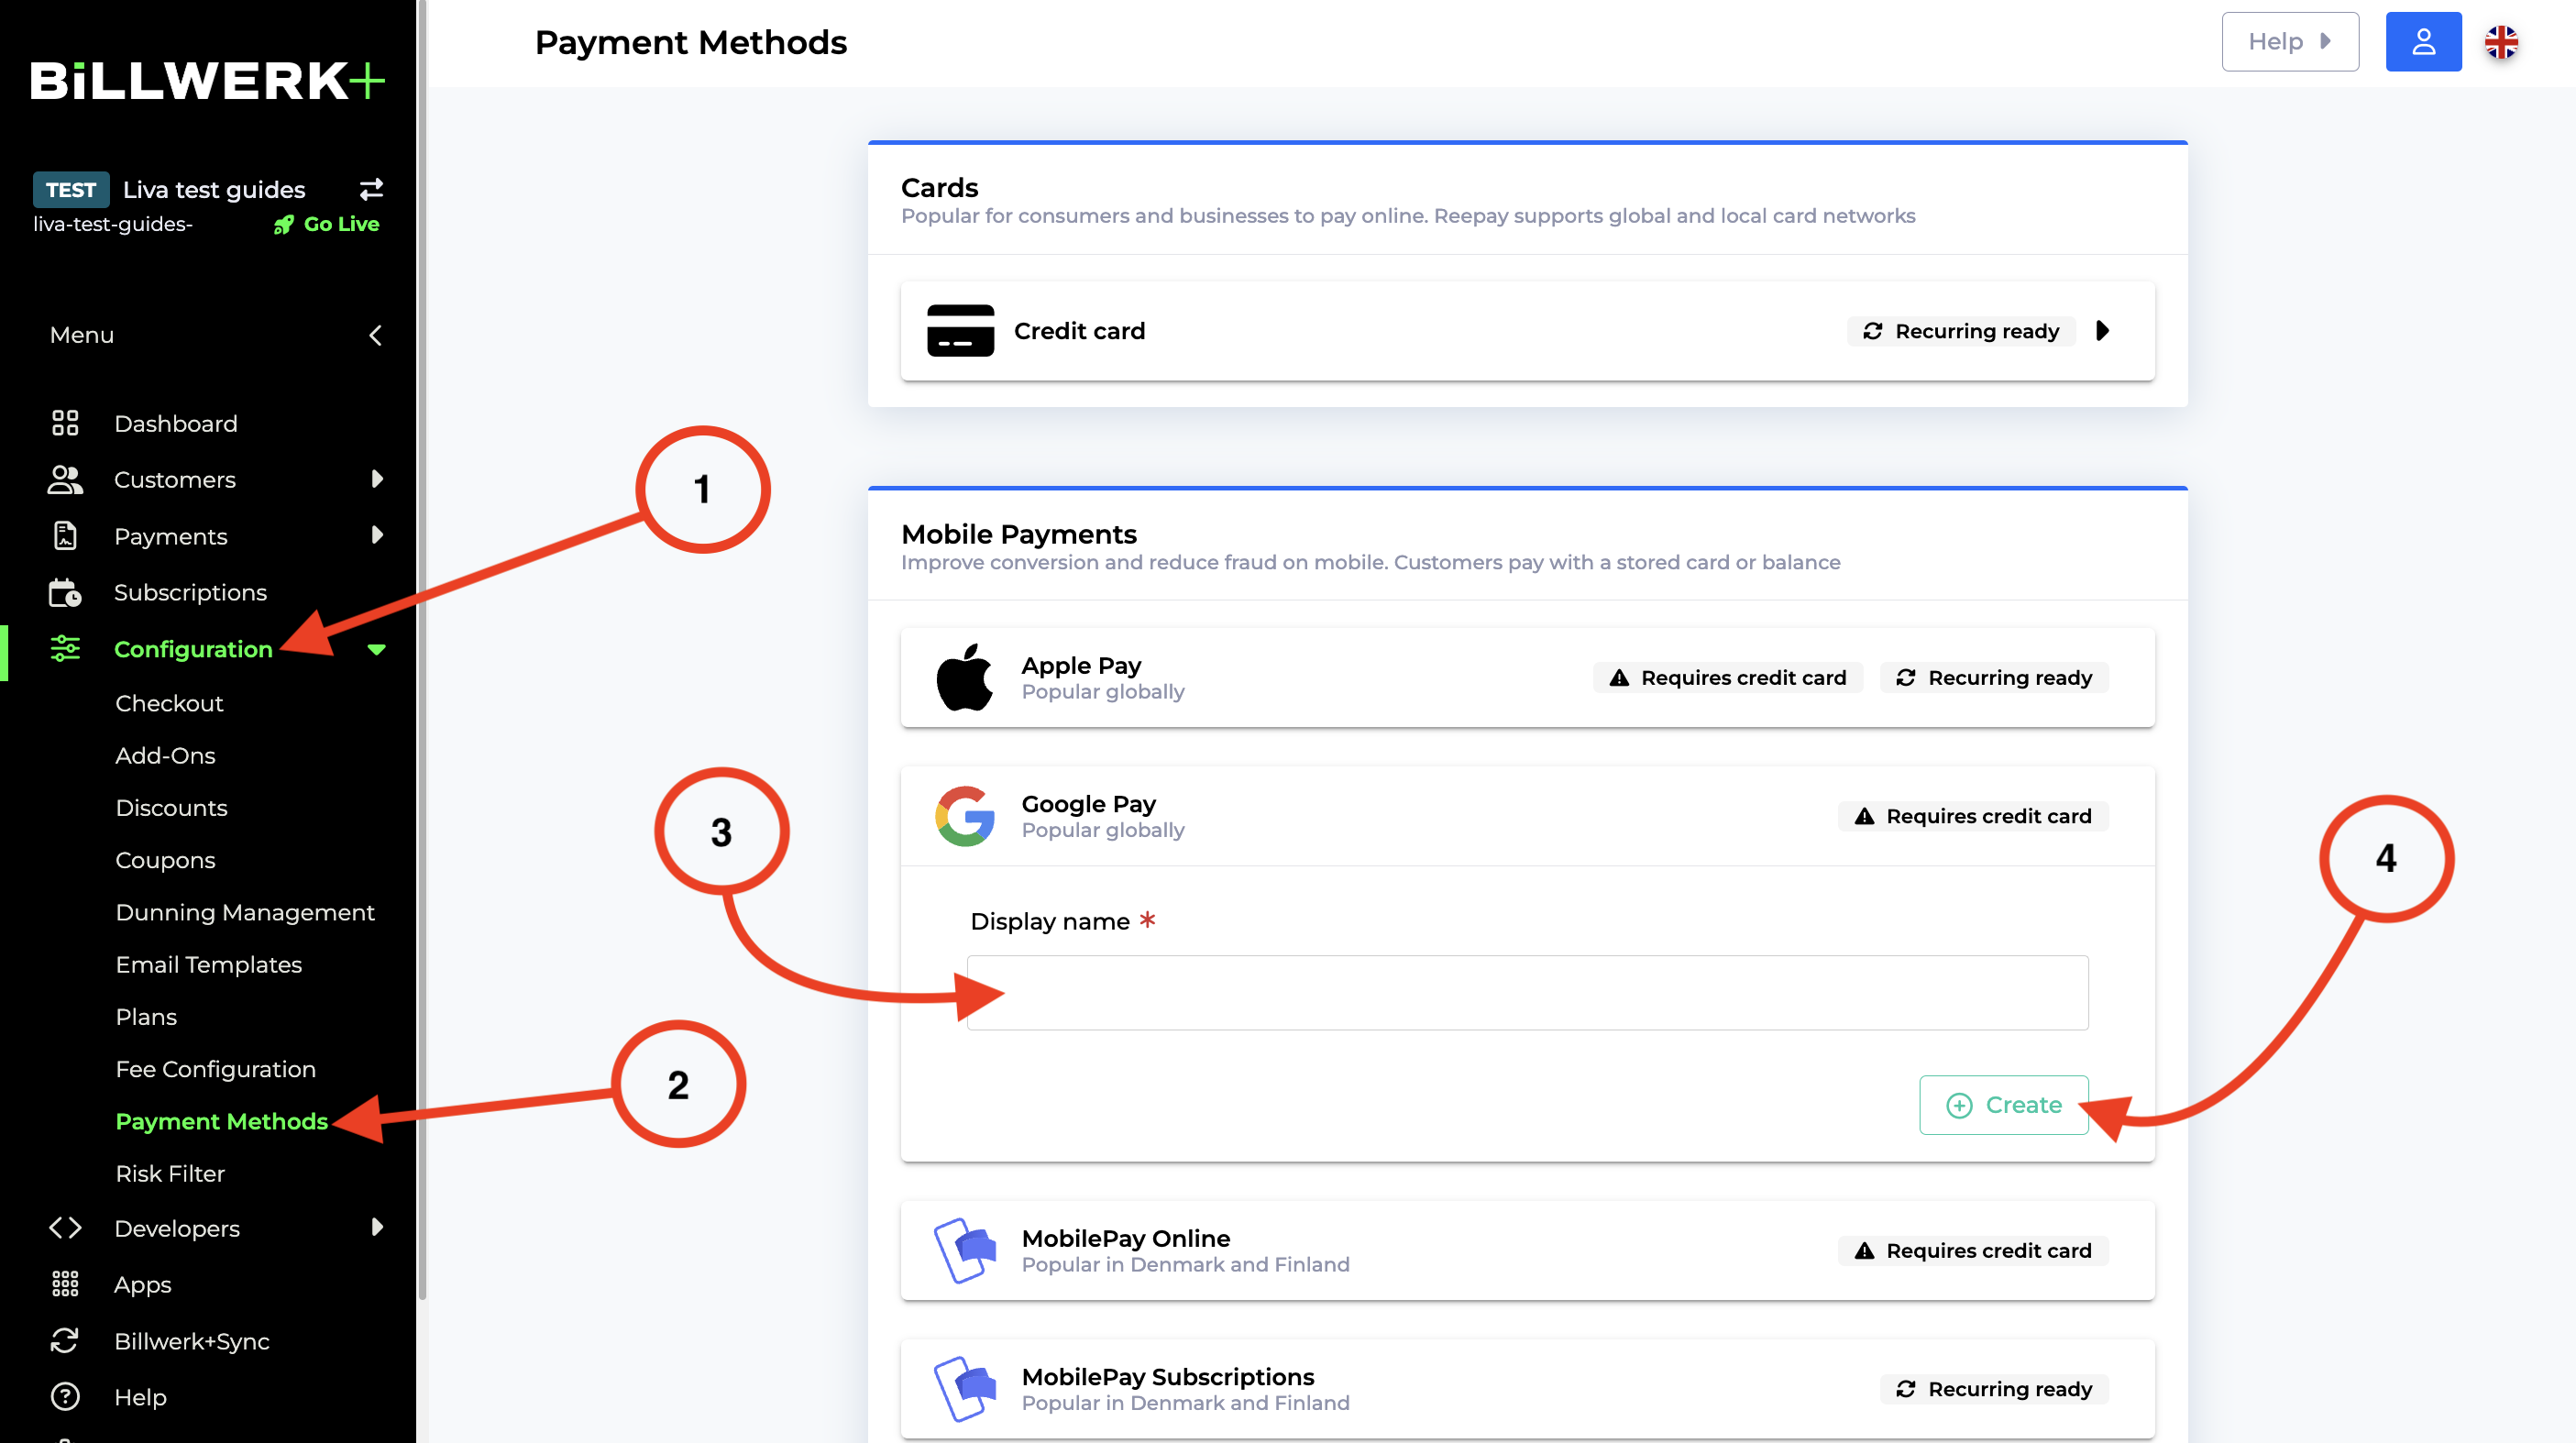
Looking at the sidebar navigation on the left side of your screen, under Configuration
 Payment Methods you will find Payment Methods.
Under Mobile Payments click on Google Pay.
Enter the name of your web shop into the Display name field.
Click on Create.
Information about Strong Customer Authentication
SCA Step-up Google Pay supports both tokenized and non-tokenized credit card numbers. Due to the new strong customer strong authentication requirements, if a Google Pay payment is using a non-tokenized card number, a separate SCA step-up flow will be initiated. The user will have to validate his card credentials, e.g. by entering a one-time code from an SMS.
Note
Note that Billwerk+ Pay has not yet implemented the SCA step-up for Google Pay. Therefore in the payment request to Google Pay, we indicate that only tokenized cards can be selected.
When we are ready to process non-tokenized credit cards for Google Pay, the SCA step-up process will be handled automatically as part of Billwerk+ Checkout and no further configuration will be needed.
Instalments
Available Instalments Providers
Reach customers who want to pay in instalments - buy now, pay later payment solutions.
Note
Your business still receives the full payment at checkout.
Looking at the sidebar navigation on the left side of your screen, under Configuration  Payment Methods you will find Payment Methods.
When scrolling to Instalments, you will find this list:
Provider | Popular | Link to the homepage | Link to our documentation |
|---|---|---|---|
Viabill | in Denmark | ||
Klarna | globally | ||
Resurs Bank | in Scandinavia | ||
Anyday | in Denmark |
Instalment Provider ViaBill
ViaBill allows your customers to pay for their purchases over time, interest-free. This way they can buy now at a price that works for them.
Caution
Please set up first a ViaBill account. Click here to sign up.
Looking at the sidebar navigation on the left side of your screen, under Configuration
 Payment Methods you will find Payment Methods.
Scroll to the Instalments box.
Click on ViaBill.
Now insert your ViaBill API key in the API key field. ViaBill will provide you with this number. If you did not get any, please ask ViaBill for it.
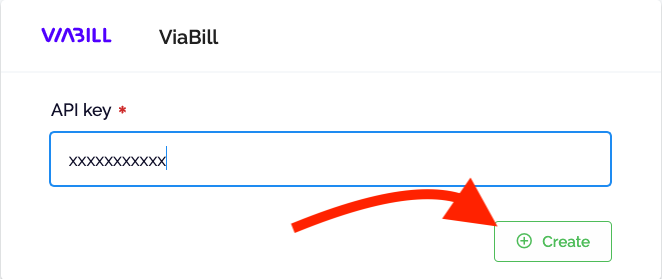
Click on Create.
Good job! Now your clients can use ViaBill to use instalments.
Get started offering Klarna through Billwerk
Klarna Bank AB, commonly referred to as Klarna, is a Swedish fintech company that provides online financial services such as payments for online storefronts and direct payments along with post-purchase payments.
This article shows you
How to get an agreement with Klarna
In order to get an agreement with Klarna, contact via their website and indicate your company details below. The Klarna Team will respond to you from there.
Annual Sales Volume
First Name
Last Name
Email
Phone
Website
What do you sell?
Average Order Value
E-commerce platform
Instagram Account Name
You can advantageously say that you use Billwerk+ as a Payment Gateway.
For your agreement to be accepted, the following details must be visible on your webshop :
Organisation number – please note that the organisation number specified on the webshop must match the one registered with Klarna
Registered company name
Registered company address
Prices on the products including transaction currency
Product description
Terms and conditions
Your contact details including an email address
Return policy including 14 days return rights
Shipping policy. If shipping costs are added, the amount needs to be specified
Estimated delivery time
Note
Your URL must be live
Your URL must not redirect to another website
All links on the webshop must work, no error messages should appear
Klarna API credentials
Now let us see, how you find your credentials.
First login to your Klarna account here.
Navigate to Indstillinger or Settings.
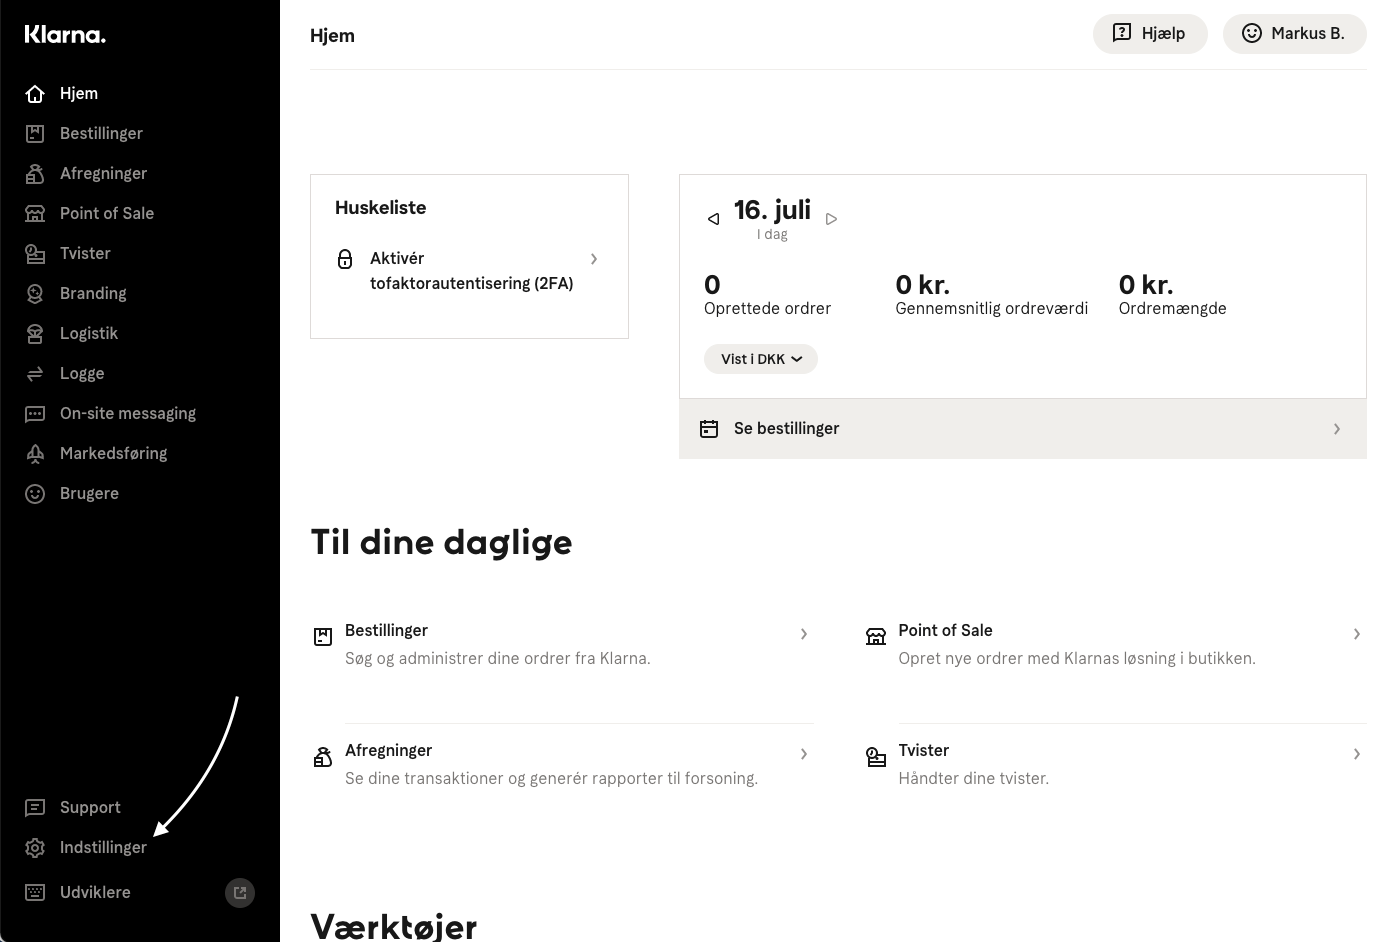
You should be redirected directly to your Klarna API-user page. If not chose the page in the menu.
Now click Create new Klarna API-user.
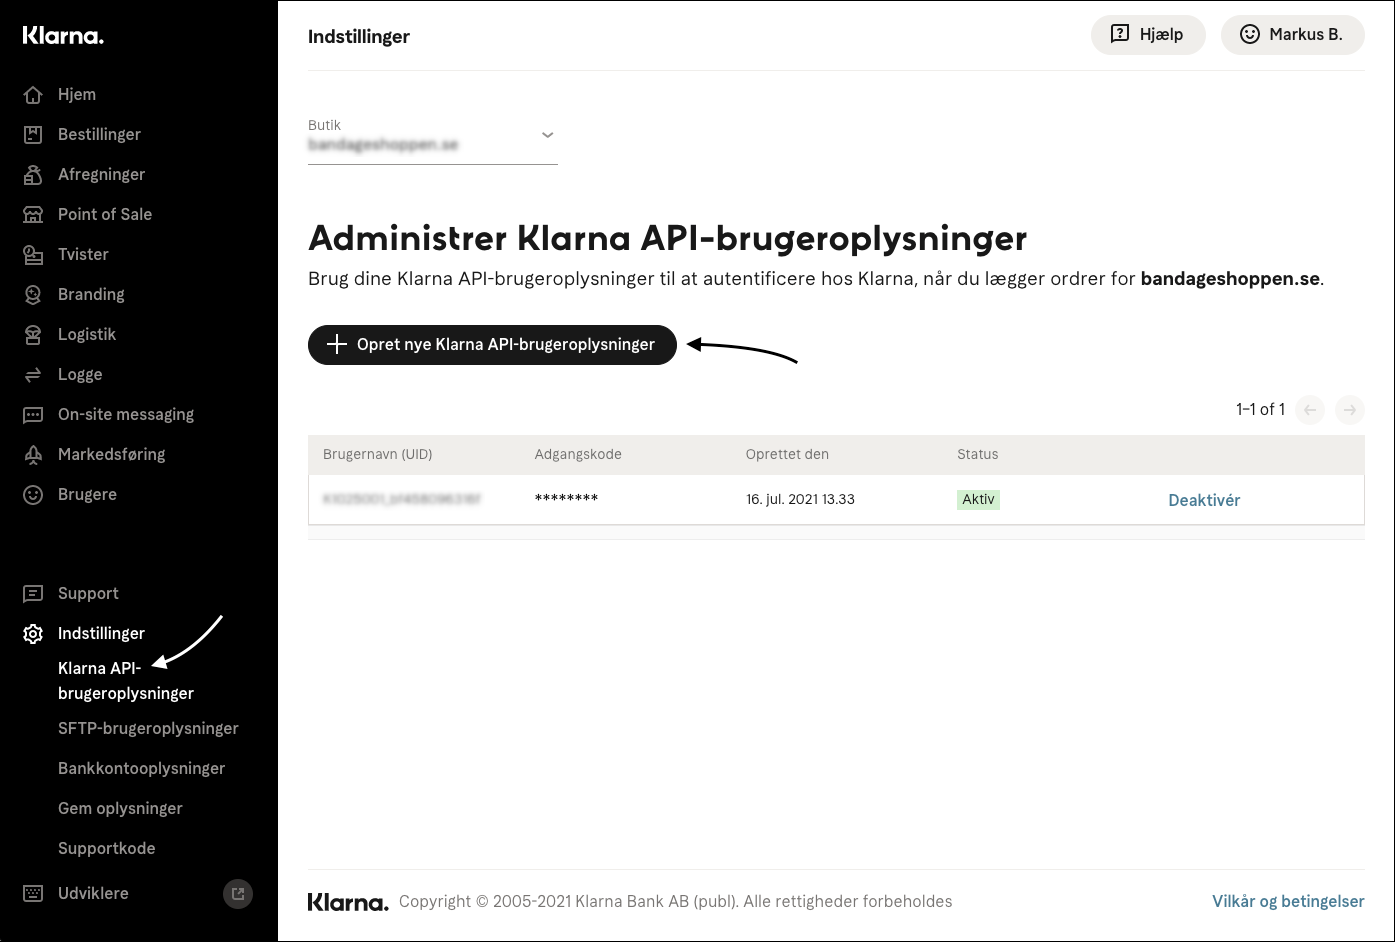
You will now see your API username (UID) and password.
Note
Ensure to save them on your computer or download the .txt file.
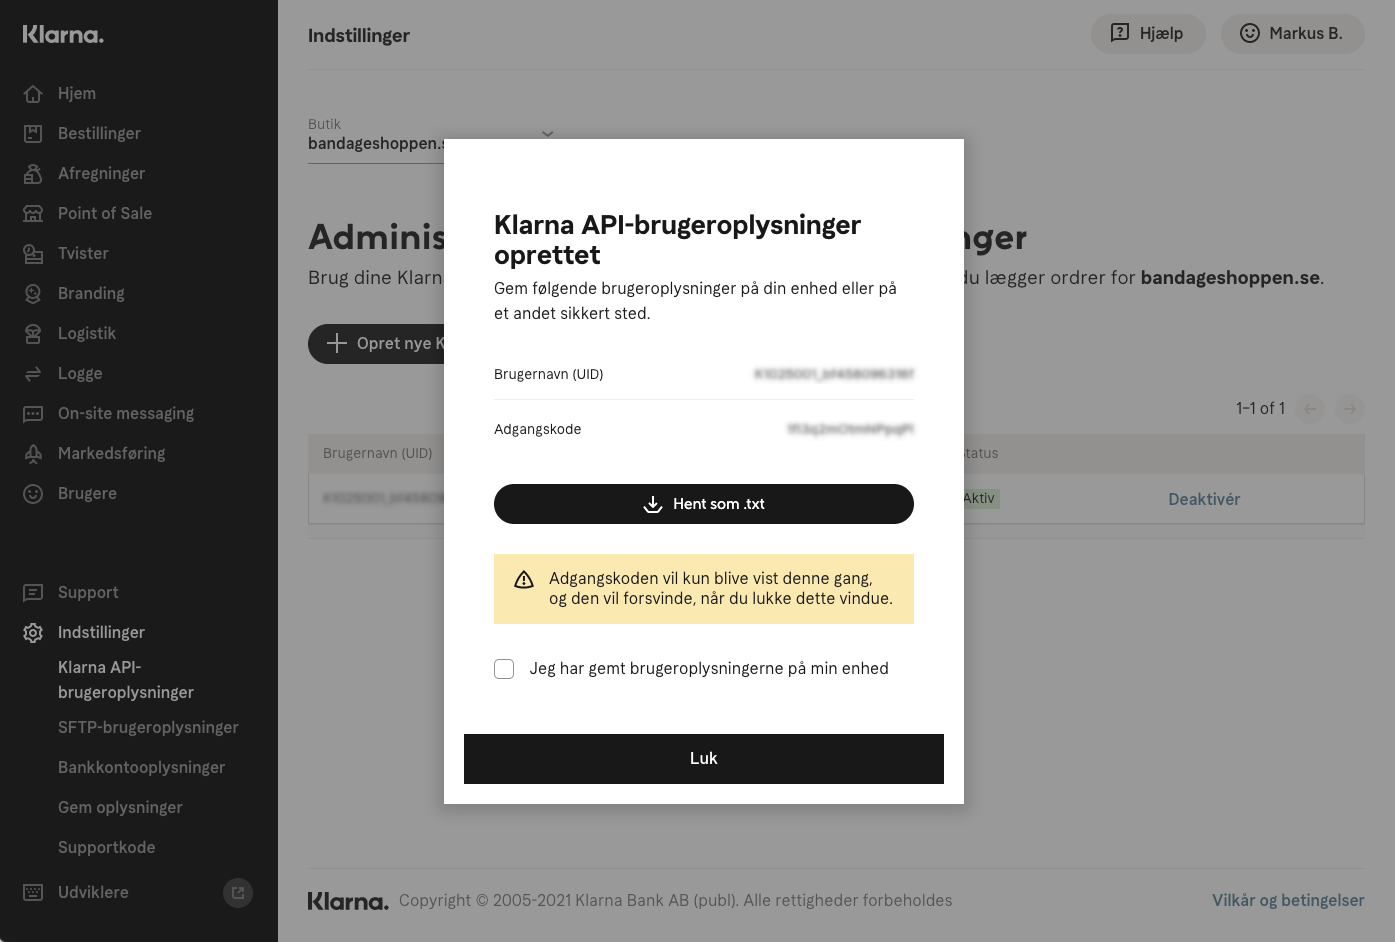
Very good, now we will see how to use them in your Billwerk+ Payment App.
Setup Klarna Pay Later or Klarna Slice it
Return into the Billwerk+ Pay App.
Looking at the sidebar navigation on the left side of your screen, under Configuration
 Payment Methods you will find Payment Methods.
Scroll to Instalments.
Select either Klarna Pay Later or Klarna Slice it.
Insert your API username (UID) and password.
Click on Create.
Good job! Now your clients can select Klarna Slice it or Klarna Pay Later in the Check out.
Instalment Provider Resurs Bank
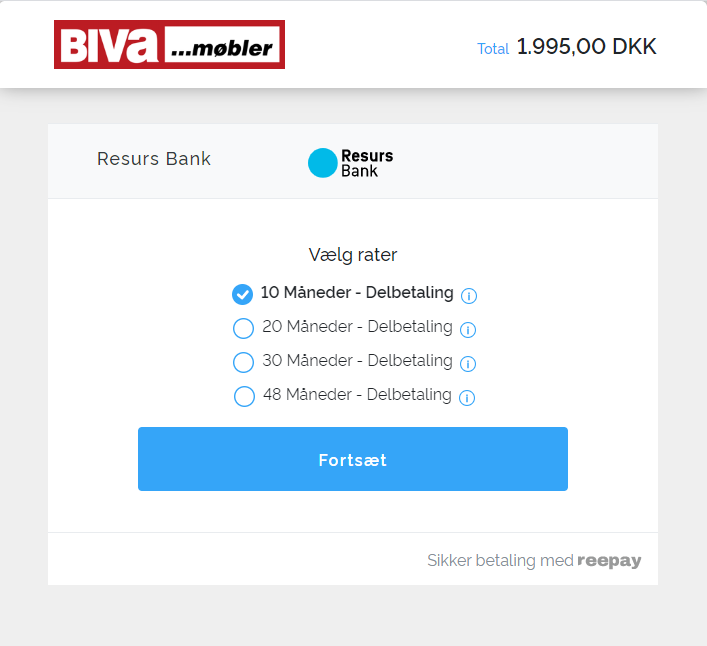
Resurs Bank is a Nordic finance company that offers instalment payment solutions and our partner.
Would you like to hear about these opportunities?
Please contact Michael Abild at michael.Abild@resurs.dk or Thomas Petersen at thomas.Petersen@resurs.dk from Resurs Bank.
When you get the agreement we will help you set up Resurs Bank in the Billwerk+ Pay administration. Please contact ree-support@billwerk.plus.
Instalment Provider Anyday
You can add Anyday to your checkout to give your clients the opportunity to slice their payments.
Go to Configuration > Payment Methods then scroll down to the Instalments box.
Click on Anyday.
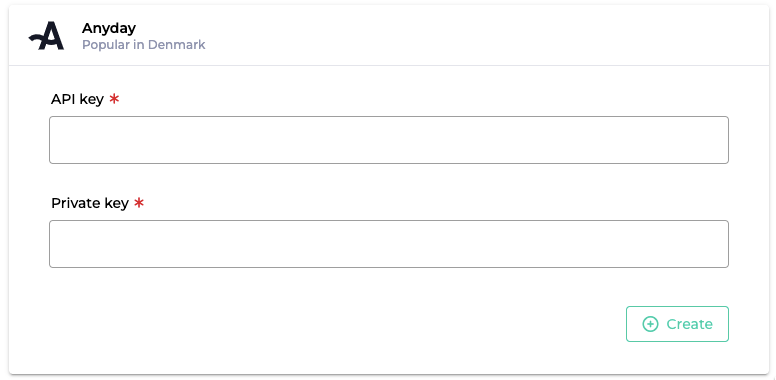
Now insert the API key and Private key to establish the connection.
Click on  .
.
Bank redirects
Available Bank Redirects Providers
You would like to improve conversion and reduce fraud by letting customers pay online using their bank accounts? Please find here the list of providers for this service.
Looking at the sidebar navigation on the left side of your screen, under Configuration  Payment Methods you will find Payment Methods.
Now scroll to Bank Redirects to find these providers:
Provider | Popular | Link to the homepage |
|---|---|---|
Klarna Pay Now | globally | |
Blik One Click | in Poland | |
iDEAL | in Netherlands | |
Przelewy24 | in Poland | |
GiroPay | in Germany | |
Finland Banks | in Finland | |
Bancontact | in Belgium |
Bank debits and transfers providers
Bank debit and transfers are used worldwide and are excellent payment methods for lowering the chance of payment failure.
Looking at the sidebar navigation on the left side of your screen, under Configuration  Payment Methods you will find Payment Methods.
Please scroll down to the very bottom of the page until you find Bank Debits and Transfers.
Billwerk+ Payments offers you a connection to SEPA Direct Debit.
Payment Methods FAQ
Frictionless 3D Secure
3D Secure frictionless is the newest iteration of 3D Secure:
which is a frictionless flow
that allows customers to complete the 3D Secure authentication process
without redirecting them from the checkout flow if the transaction is deemed eligible by their bank
if the transaction is deemed eligible by their bank.
This means that the payments are being made with 3DS, but the customers are not forced through the flow, which can have a positive impact on your conversion rate.
Activate Frictionless 3D Secure
Open your Billwerk+ Payment Application.
Looking at the sidebar navigation on the left side of your screen, under Configuration
 Payment Methods you will find Payment Methods.
Click on Credit Cards.
Then click on an active Acquirer agreement.
Scroll to the bottom.
Click on Advanced.
Under Strong customer authentication you can enable 3D Secure or 3D Secure for recurring.

You will see the option Require SCA by default.
Require means you force all your customers through the 3DS (3D Secure) flow, with 2-factor authentication.

Note
If the checkmark is not set, payments can run frictionless through 3DS.
Interchange++ (IC++)
Interchange ++ benefits you, it refers to a pricing model where the acquirer will charge a merchant, for every card transaction, using a rate made of three components:
Firstly, the basis is always the interchange percentage fee
On top of that, a card scheme fee is added
and lastly a fixed percentage Acquirer fee is added by the provider.
The sum of these three fees is the final rate that the merchant is being charged with for every transaction. The benefit of such a pricing model over the fixed blended rate model is full transparency, resulting in lower overall fees.
Interchange percentage fee (IC)
Due for every card transaction, this exchange fee is paid by the merchant bank (acquirer) to the customer’s bank (issuing bank). This is why it is also called the issuer fee.
0.20% - 1.80% on each transaction
Card scheme fee (+)
Card organisations such as Visa or Mastercard charge a fee for handling and processing each transaction; this fee may vary depending on the location, security of the transaction or card type.
0.02% - 0.65% on each transaction
Acquirer fee (+)
A fixed fee is charged for the provision of a card service; this fee already covers the costs of service processing.
Your offered price from the acquiring bank.
Move cards between acquirer agreements
Caution
Be aware that if you are moving cards to or between Clearhaus agreements, you need to first contact us, or else the move will fail.
The presented method :
can be done manually one by one in the Billwerk+ Pay backend
but you could also use the Billwerk+ Pay API to move larger batches of customers, for moving cards through API you can find everything your developer needs right here.
This article focus is on the manual method.
Disable/ Activate the acquirer agreement
Before you start, make sure that:
the acquirer agreement you are moving cards from has been disabled
the agreement you want your cards to move to has been enabled
In order to do so, please follow these steps :
Navigate to Configuration > Payment method.
Click in the Cards box on Credit Card.
Disable the acquirer agreement of your choice.
Activate the acquirer agreement you would like to use instead.
Manually move cards
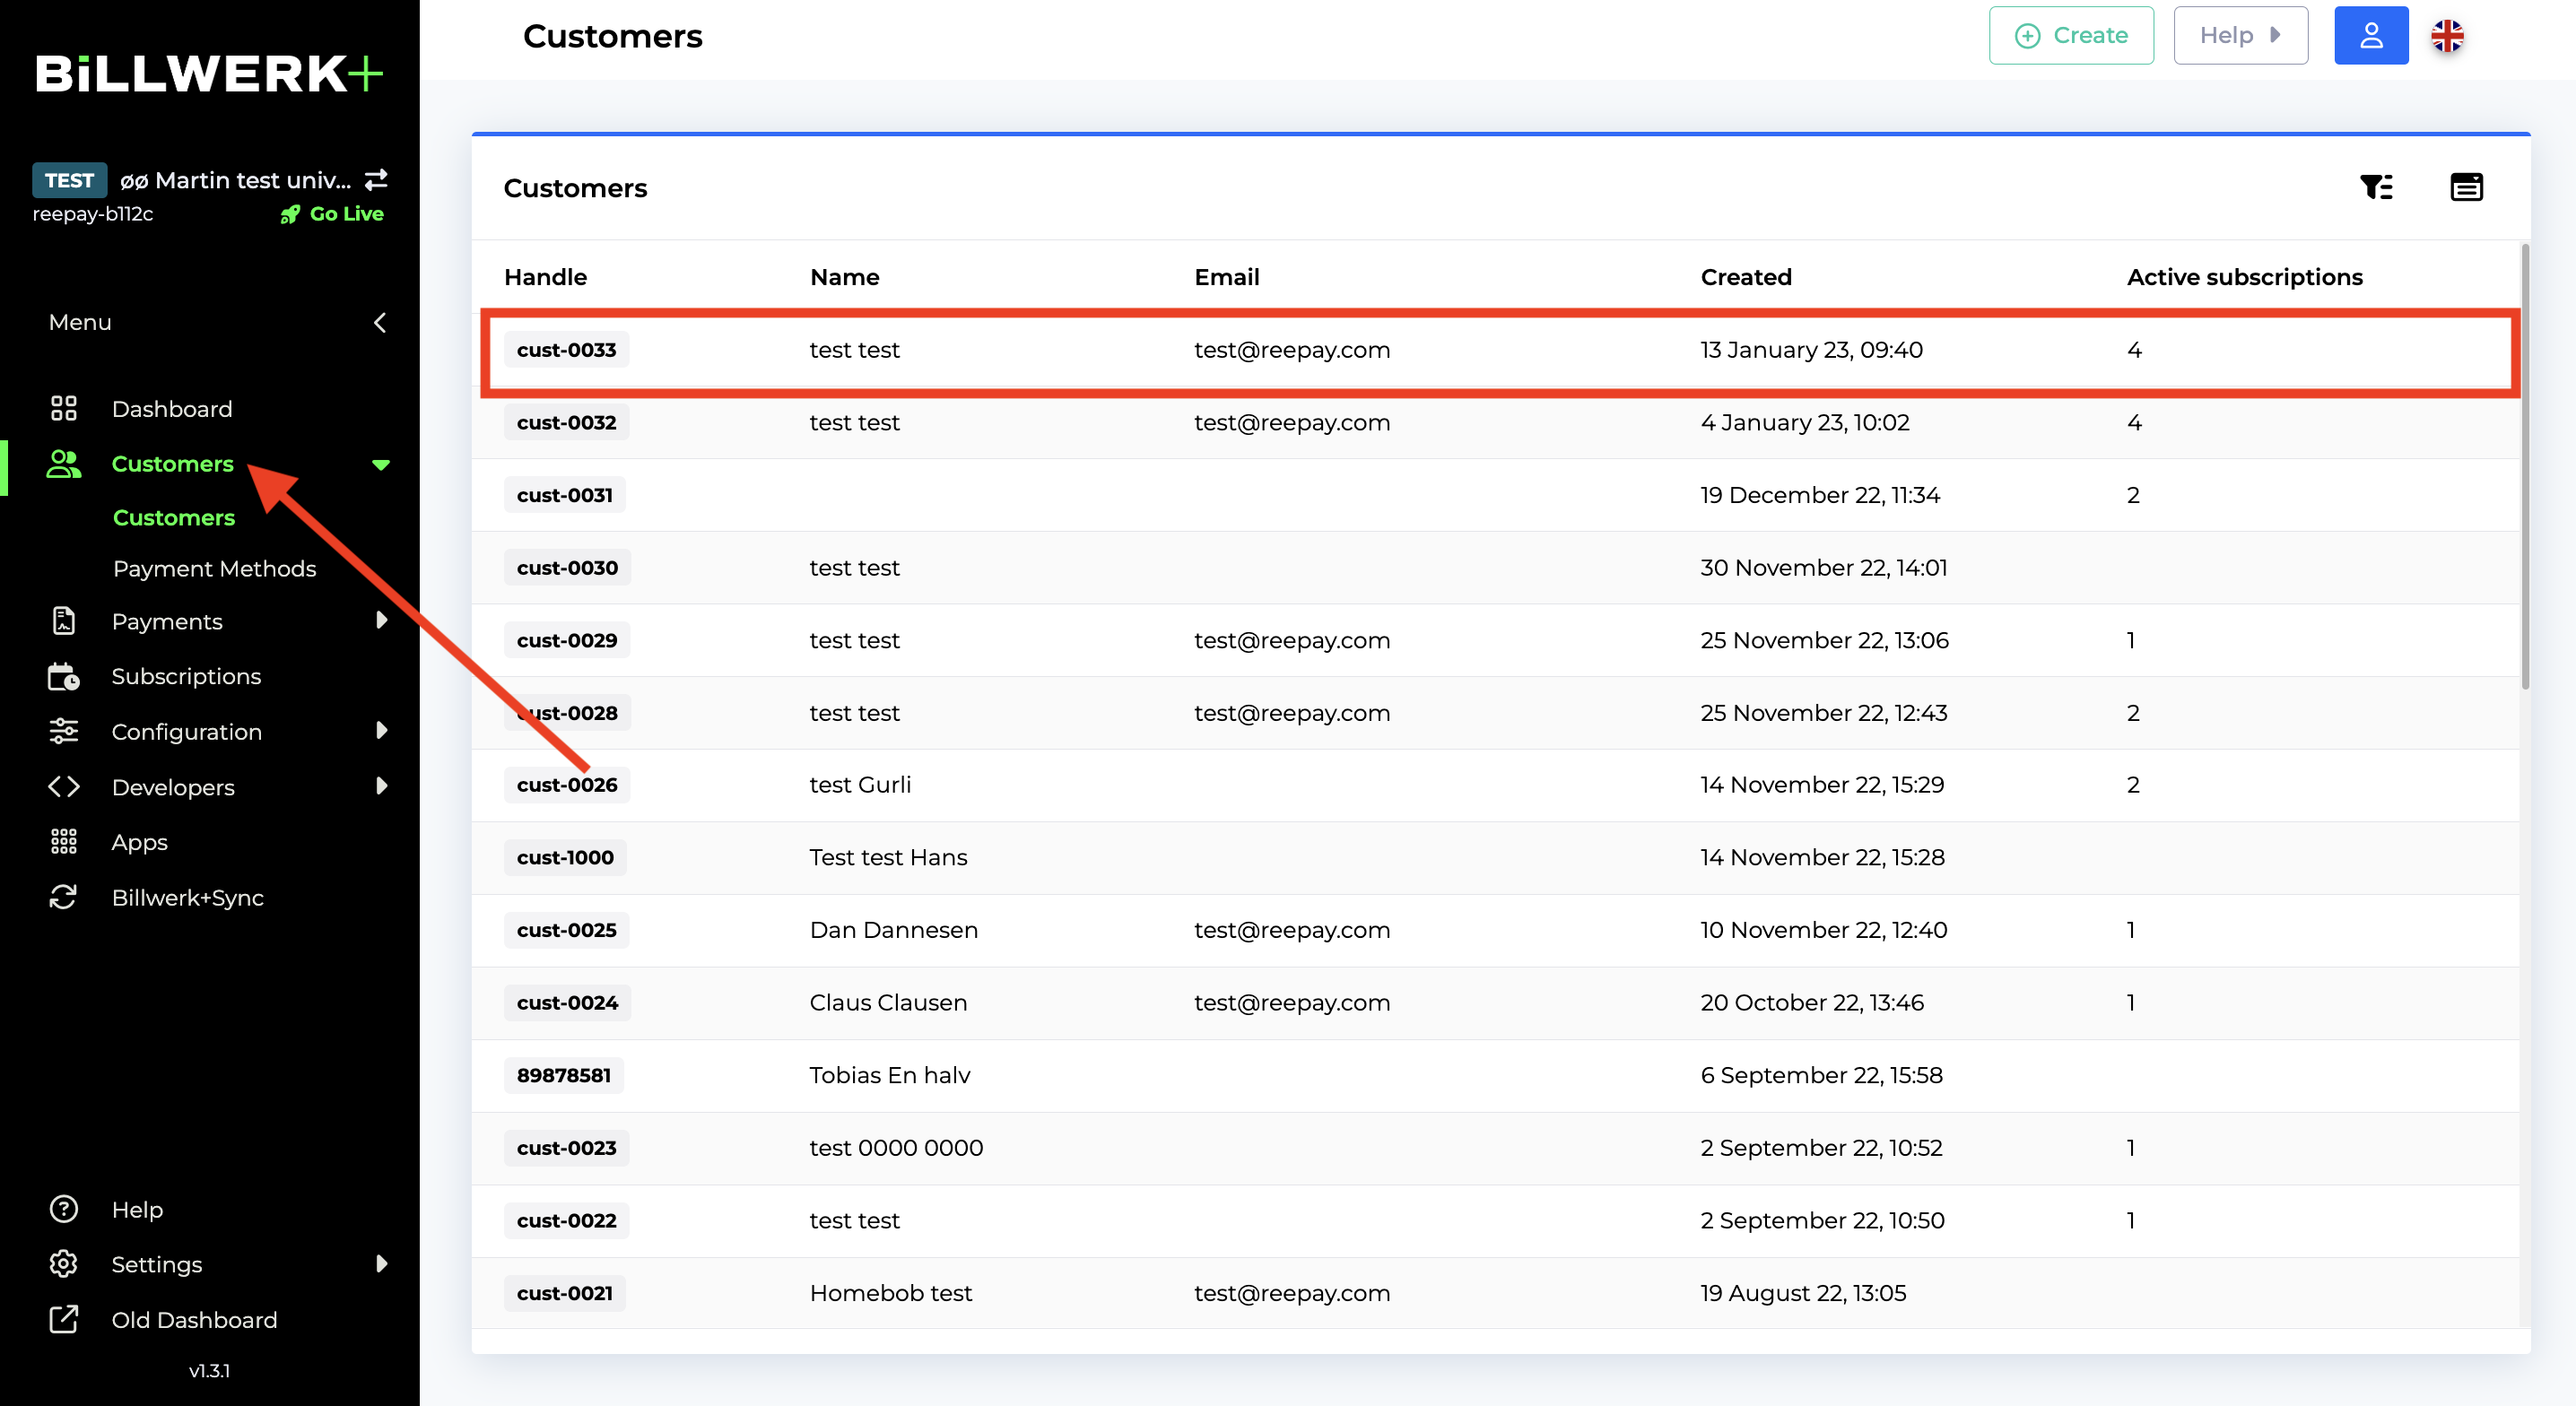
Go to the Customer section and find the customer you want to move cards on.
Under Payment methods find the payment method you want to move.
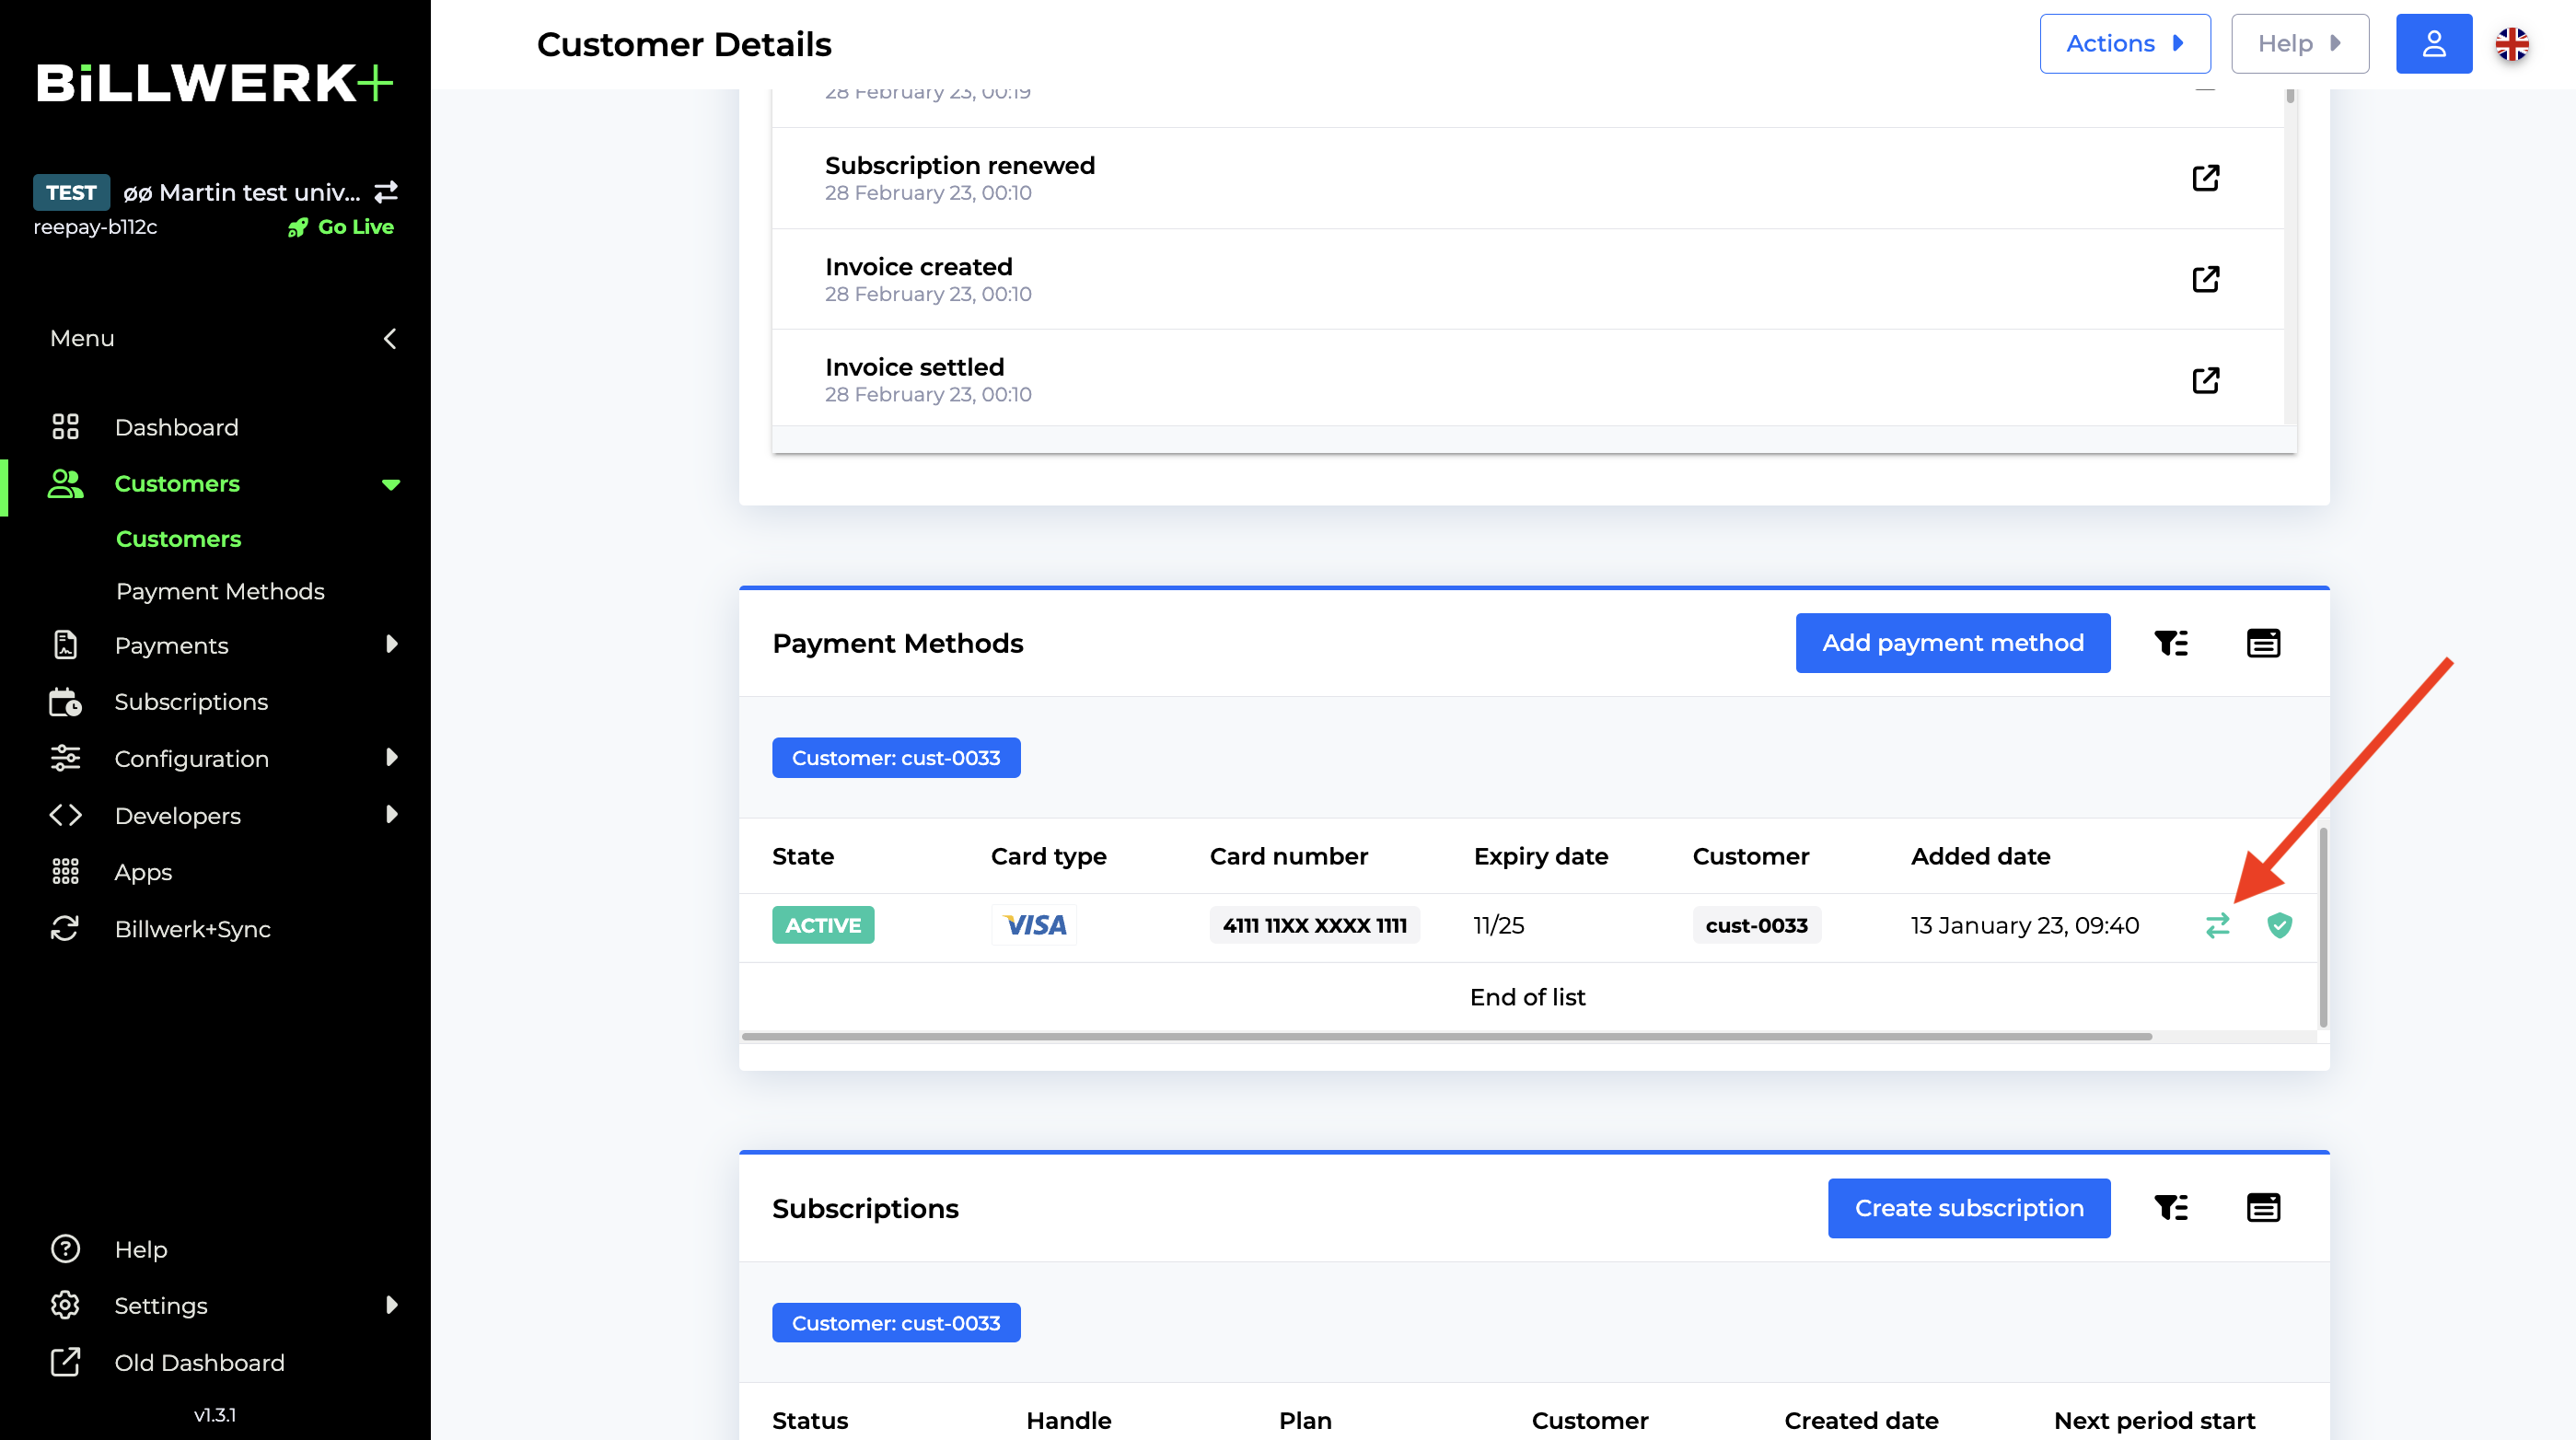
Click on the icon with two green arrows.
A small popup opens, where you will select your active acquirer agreement.
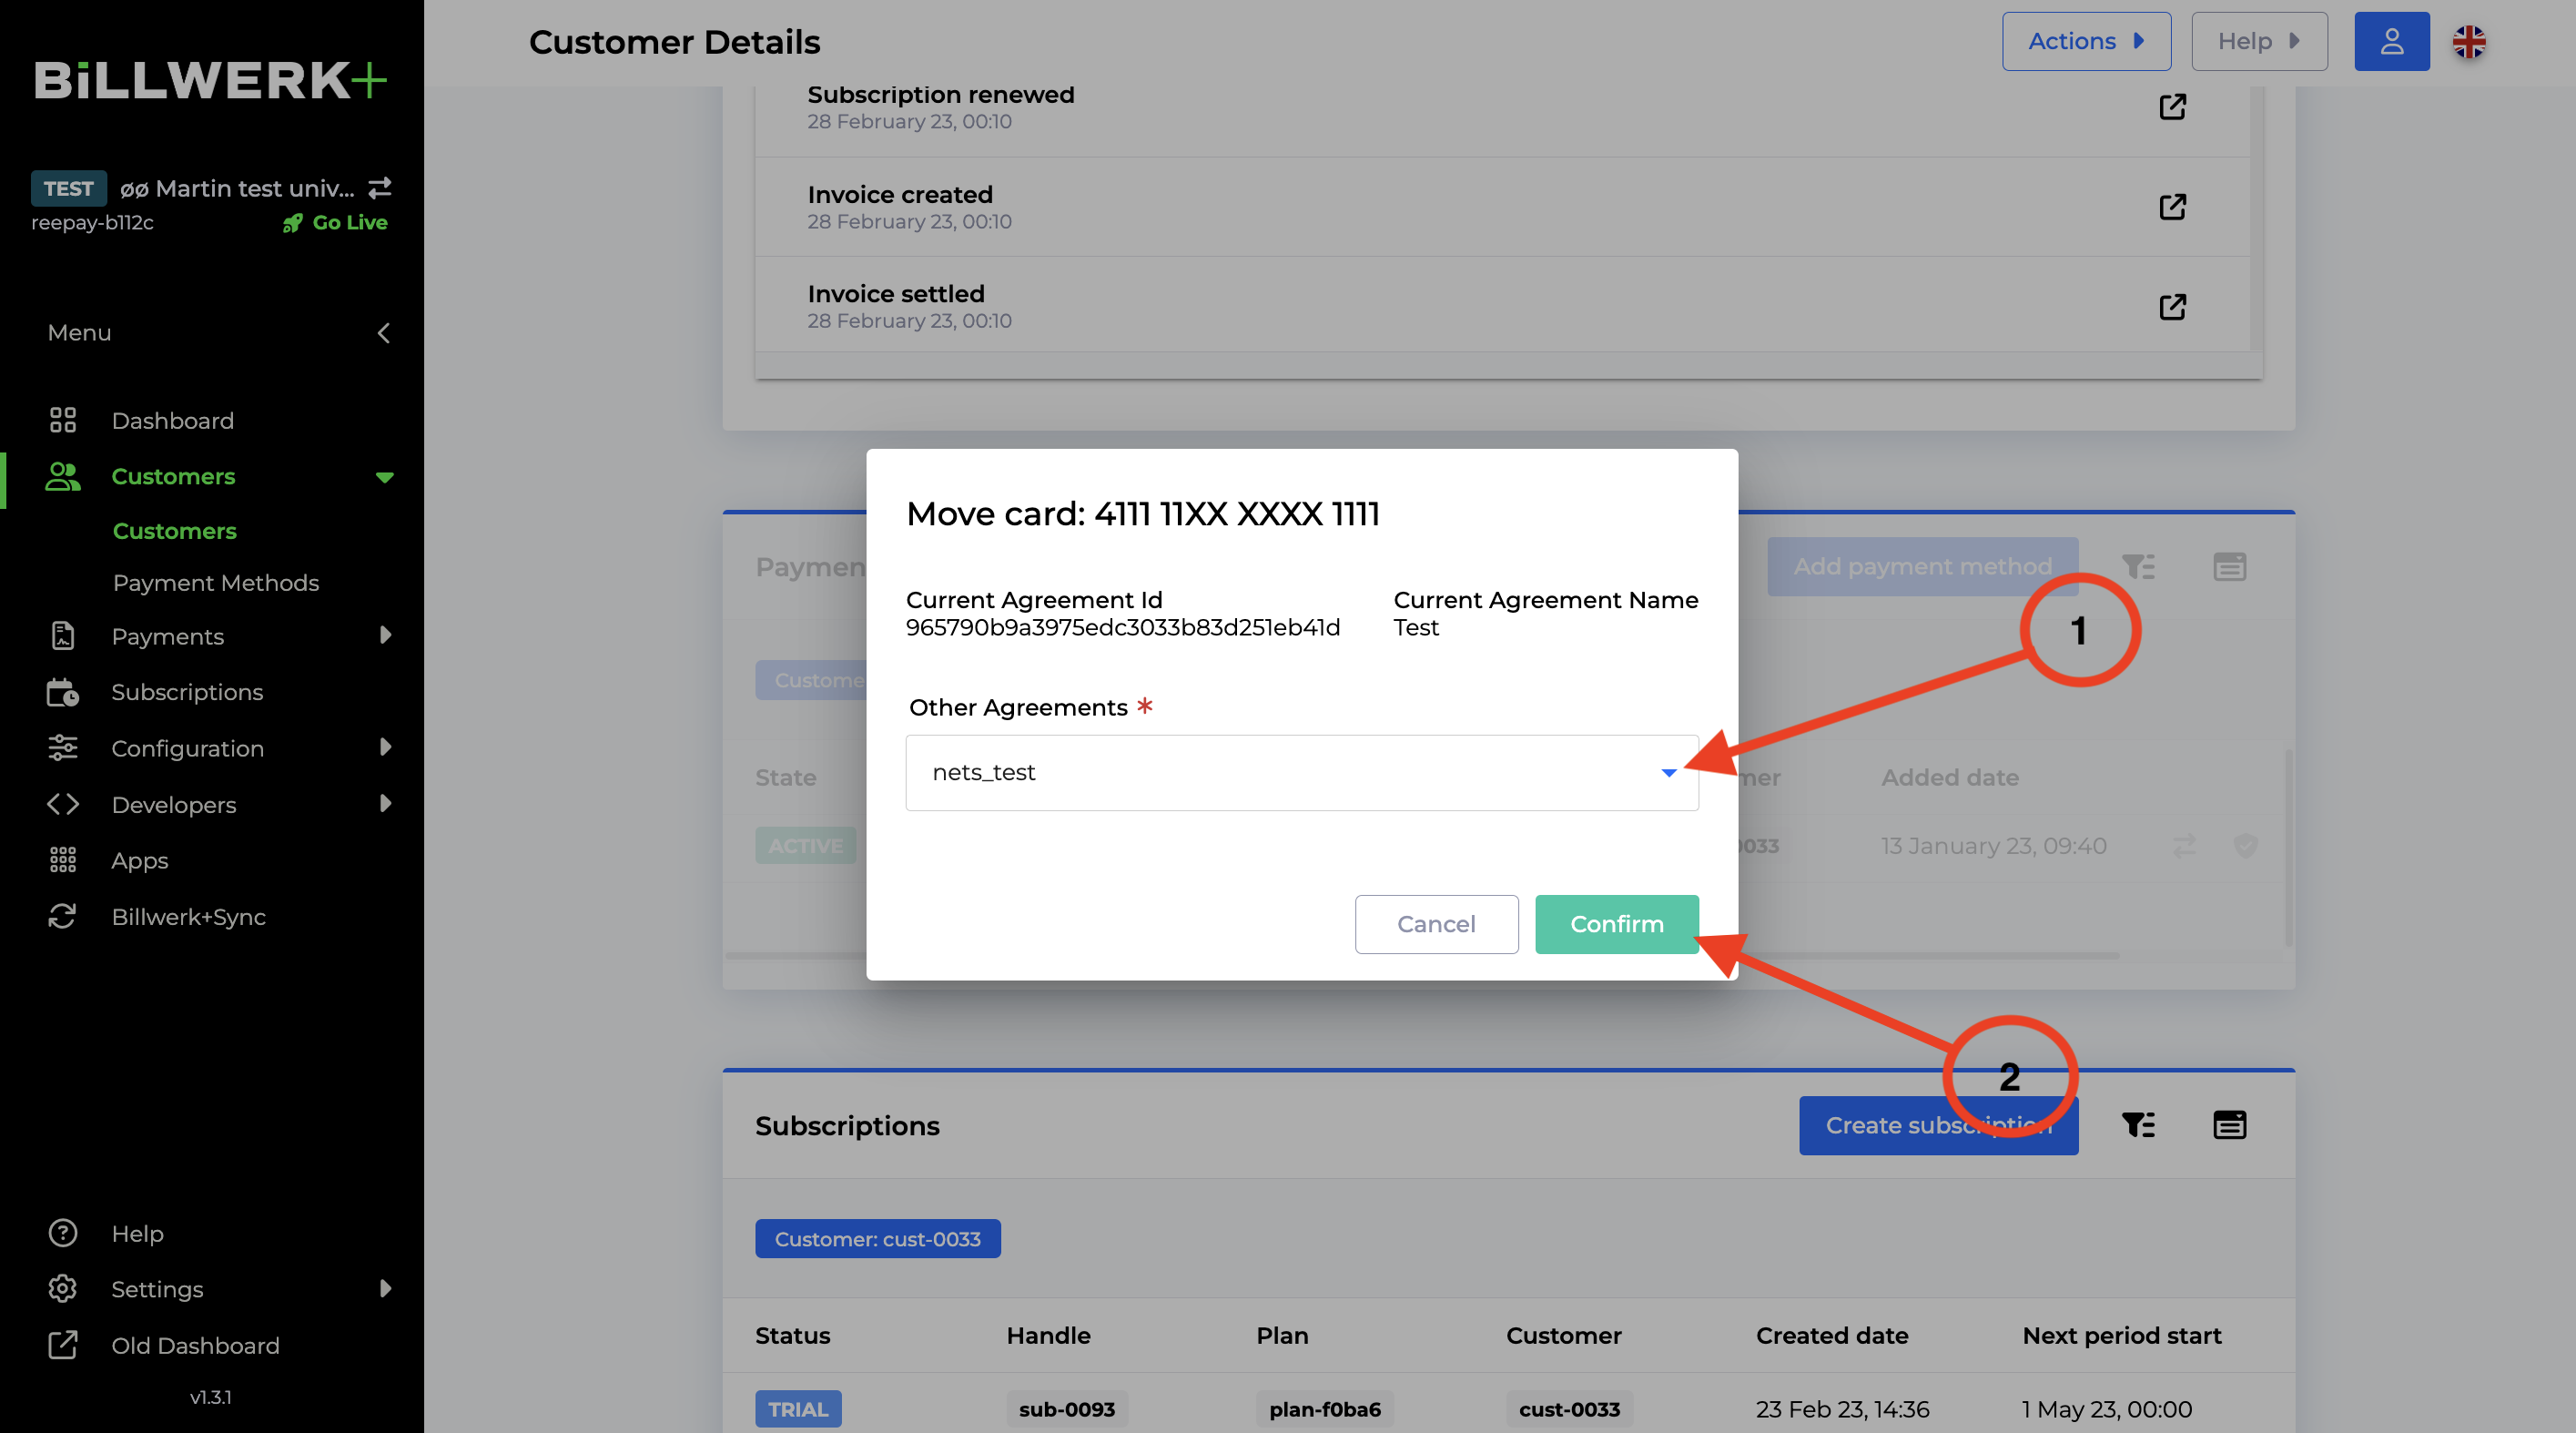
Click confirm.
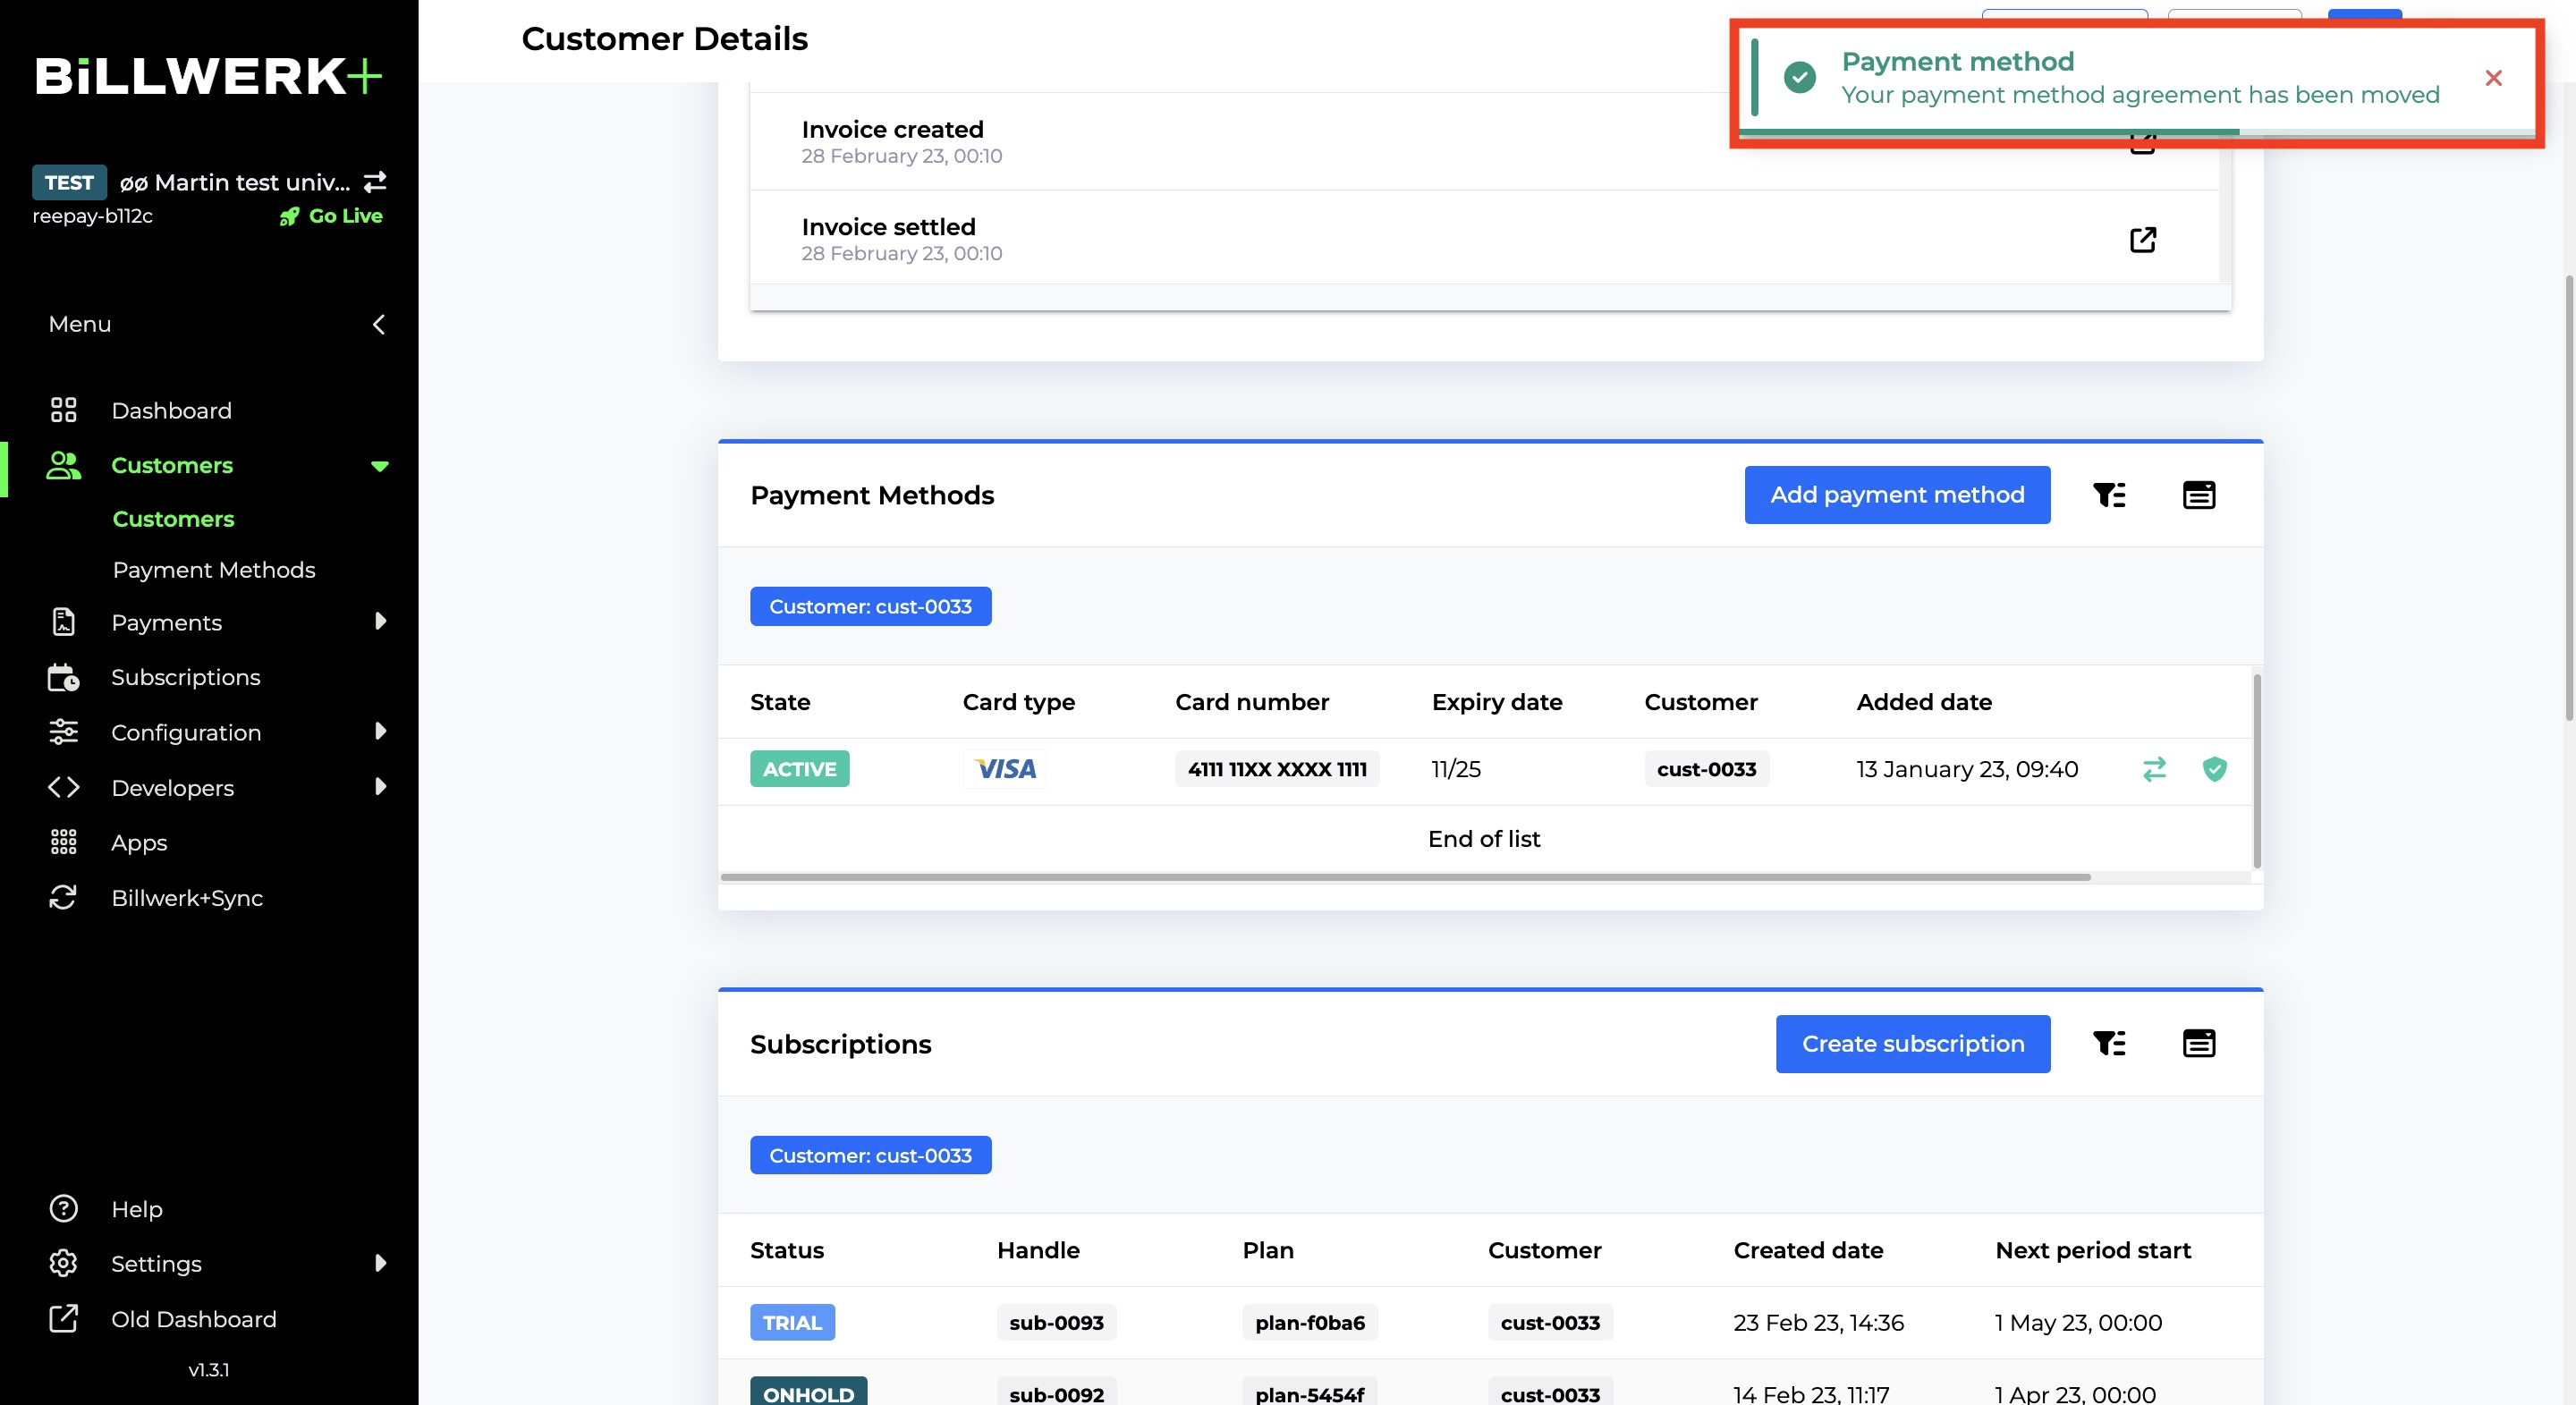
If all is done correctly, you will now see a small green confirmation box in the top right corner.
Payout from your acquirer
You ask yourself, when you get the money paid out to my bank account, after a successful payment?
It all depends upon your agreement with the acquirer, some pay out every day with two days delay, while others do it a fixed week day with a 3 days delay.
If you for example use Clearhaus and have weekly payout that will mean that transactions done from Monday til next coming Monday 9pm will be payed out next Thursday. This payout have 3 days delay.
If you want to know more about when your transaction are payed to you bank account, please contact your acquirer.
Danish Payment Card Dankort
Enable or disable a payment method or acquirer agreement
This article show you how to enable or disable a payment method or acquirer agreement in Billwerk+ Pay.
In the navigation side bar on your left, click on Configuration.
Click then on Payment Methods.
Click on Credit card in the Cards box.
Once you set up the Card acquiring you can enable or disable by using the switch:

Note
You can find the same switch for every payment method once configured.
